Employer Self-Service
Employer Self-Service (ESS) allows employers to perform monthly reporting, user administrative, and other member reporting functions. In order to access ESS, you must have a valid login name and password. For administrative users, this login information is generated and sent in three emails by TCRS. For subsequent users, the login information is requested through an employer’s ESS Administrator, and then credentials are automatically generated and sent in three emails to the new user. Once logged in, you can access functionality based on assigned security roles. There are three security roles in ESS – administrative, monthly reporting, and staff. Each role has different security permissions within ESS. There are four tabs within ESS where the following tasks can be performed:
· Reports
o The Submit Monthly Report screen allows you to submit monthly detail information along with a monthly summary and payment information associated with the monthly contribution report. Typically, employers with less than 100 employees submit this information on the Enter Report Details screen. Larger employers submit this information using the upload detail file functionality which submits a file in the prescribed format. You can also use this module to correct any external errors which may have triggered on the contribution detail rows submitted. You can only submit the Monthly Summary and remit payment to TCRS once data is corrected
o TheMonthly Packet screen allows you to view the contents of your monthly packet and provides you with reports that may need to be updated in subsequent reports. Each piece of the packet displays as a PDF. The Monthly Packet generates on the 25th of each month and you receive an email notification when your new monthly packet is available
o TheDownload Member ID screen allows you to download member IDs for either a particular member or a set of members based on defined search criteria. In addition, you can determine contribution group category and participation dates for members
o TheInvoices screen allows you to view and remit payment for outstanding invoices. Each invoice is viewable in PDF form and the stored EFT or e-check payment account information can be used to remit payment for the invoices. Invoices must be paid in full
· Services
o TheDeath Notice screen allows you to enter death information for a deceased employee. Information entered on this screen is immediately transmitted and stored in the Concord database and can be viewed in the Concord system (Concord) by authorized TCRS staff. Additionally, the submission of death notice information generates a workflow to the TCRS Financial Services division to follow up; the date of death is recorded, but not verified in Concord until a death certificate is remitted
o TheSeminar Registration screen allows you to register for seminars via ESS. These are seminars that are created internally via the counseling and scheduling modules
o TheOnline Certification screen allows you to certify refund, retirement, and service purchase applications received at TCRS and generated via Member Self-Service. Once certified by the employer, these processes are finalized by TCRS staff using Concord
o TheEmployer Information screen allows the user to view general information about the selected employer that is participating with TCRS. Current rates, reference employers, and plan provisions can be viewed using this screen
o The Reports screen allows you to generate ad-hoc reports using pre-defined parameters. Additionally employer fiscal year-end statement can be generated from this screen
o TheMessage Center screen allows you to view messages that have been sent from Concord’s Correspondence module. Documents sent from Concord can be viewed as attachments to the messages. Additionally, an email notification alerting you to new message center content is sent to the contact person’s listed email address
· Account
o The Change Password screen allows you to change your ESS password
o The Change PIN screen allows you to change your ESS PIN
o The Change Security Question allows you to change your ESS security question
· Admin
o ThePayment Accounts screen allows you to maintain electronic payment accounts. You can enter and store EFT or e-check account information.
o TheOffice Locations screen allows you to maintain office location information. You can add new office location information that can be assigned to particular contact persons
o TheContact Persons screen allows you to identify employees within your organization who you want to set as contacts within the organization. Contact persons must be entered as contacts before they can be setup as an ESS user
o TheManage Users screen allows employers to maintain user information for employees who require access to ESS. Role assignment as well as password maintenance is included on this screen. Only users in an administrative role in ESS have access to this functionality
1.1. What You Will Be Able To Do
At the end of this chapter, you will be able to:
· View, correct, submit and remit payment for reports
· Enroll in seminars
· Utilize the message center
· Perform bank account maintenance
· Manage ESS user accounts
Staff for employers cannot register themselves for ESS. For the first administrative user for each employer, TCRS staff will create a username and the system will then create the necessary login credentials, including a temporary PIN and password. The temporary PIN and password are valid for 72 hours after TCRS emails them. Administrative users will receive three emails, one with each piece of information they need to log into ESS – user ID, password, and PIN. When an employer’s ESS administrator logs into ESS for the first time, they are prompted to enter a new password and PIN and select a security question.
For subsequent new users, the administrator creates the request for login credentials, which includes a temporary PIN and password, and ESS emails them to the new user. Just as with the administrative user, when the new user logs in to Self-Service, they are prompted to enter a new password and PIN and select a security question. The temporary PIN and password are valid for 72 hours after the administrative user emails them. Only in rare circumstances, such as the employer administrator locking themselves out of their account or the administrative user is unavailable, will TCRS staff create or update login credentials.
After the administrative user has created your login user ID and the system has generated your password and PIN, you must log into ESS using your user ID, temporary password, and PIN.
3.1. Logging into Employer Self-Service for the First Time
When logging into ESS for the first time, a new user is prompted to enter the administrator-generated user ID and their temporary password and PIN. You have up to 72 hours from receiving the email with your login credentials to log into ESS. If you do not, the temporary password and PIN become invalid and you will need to contact the administrative user to reset your password and PIN.
Step 1 -- From the Self-Service screen, click the Employers log in here link.

Step 2 -- On the Employer Self-Service Login screen, enter your user ID.

Step 3 -- Enter the temporary password.
Note: Copy and paste the temporary password from the email by either right clicking and selecting copy, then paste or using keyboard shortcuts <CTRL>+<C> then <CTRL>+<V>.

Step
4 -- Click
![]() .
.

Step 5 -- There will be prompts to change the initial password. Enter the current, temporary password in the Current Password field.

Step 6 -- Enter a new password in the Your New Password field.
Note: Abide by the instructions to the right of the Your New Password field to create a new password.

Step 7 -- Re-enter the new password in the Retype Your New Password field.

Step
8 -- Click
![]() .
.

Step 9 -- The next screen has prompts to change the initial PIN. Enter the current, temporary PIN in the Current PIN field.

Step 10 -- Enter a new PIN in the Your New PIN field.

Step 11 -- Re-enter the new PIN again in the Retype Your New PIN field.

Step
12 -- Click
![]() .
.

Step 13 -- The next screen updates the security question associated with specific login credentials. Select a security question from the Security Question drop down menu.
Note: The security question and answer will be used if you ever need to reset your password or PIN.

Step 14 -- Enter the answer to the security question in the Answer field.

Step 15 -- Enter the answer to the security question in the Retype Your Answer field.

Step
16 -- Click
![]() .
.

Step
17 -- Click
![]() . The
Employer Home screen displays.
. The
Employer Home screen displays.

3.2. Logging into Employer Self-Service
After you have been registered for and have logged into ESS for the first time, you can log into ESS using the new password and PIN you created.
Step 1 -- From the Self-Service screen, click the Employers log in here link.

Step 2 -- From the Login screen, enter the ESS user ID in the User ID field.

Step 3 -- Enter the password associated with the User ID.

Step 4 -- Click
![]() .
.
Note: You are allowed five unsuccesful log in attempts before the account is locked. You will need to contact your system administrator to unlock your account. If you are the ESS Administrator, you will need to contact TCRS to unlock your account.

Step 5 -- The Home screen displays.

Employer contacts who have forgotten their user ID or password can use links on the Employer Self-Service Login screen to have their information emailed to the email address on file for them.
Note: If the system administrator has forgotten their user ID or password or locked themselves out of their account, they will need to contact TCRS to obtain their user ID or reset their password and / or unlock their account. You will not need your PIN when contacting TCRS.
4.1. Reset a Forgotten User ID
To reset or obtain a User ID, follow the steps below.
Step 1 -- From the Self-Service login screen, click the Employers log in here link.

Step 2 -- Click the Forgot User ID link to reset user ID.

Step 3 -- Enter the employer code associated with the login credentials.
Note: Ensure the preceding zeros (00) are included in the Employer Code field.

Step 4 -- Enter the email address associated with the login credentials in the E-mail field.

Step
5 -- Click
![]() .
.

Step 6 -- You will be prompted to answer the security question set up during initial log in. Answer the question correctly in the field corresponding to the security question.

Step
7 -- Click
![]() .
.

Step 8 -- The username is revealed on the subsequent screen. Click the click here link to return to the log in screen.

4.2. Reset a Forgotten Password
To reset a forgotten password, follow the steps below.
Step 1 -- From the Self-Service screen, click the Employers log in here link.

Step 2 -- Click the Forgot Password link to access password information.

Step 3 -- Enter your User ID in the corresponding field.

Step
4 -- Click
![]() .
.

Step 5 -- Answer the security question you set up when you initially logged into Employer Self-Service.

Step
6 -- Click
![]() .
.

Step 7 -- Enter your PIN in the PIN field.

Step
8 -- Click
![]() .
.

Step 9 -- Enter a new password in the Your New Password field following the instructions to the right of the field.

Step 10 -- Enter the new password again in the Retype Your New Password field.

Step
11 -- Click
![]() .
.
Note: Clicking ![]() will
return you to the initial self-service log in screen.
will
return you to the initial self-service log in screen.

Step 12 -- The password is changed and updated in the system. Click the click here link to return to the login screen.

Step 13 -- You are returned to the self-service log in screen. Click the Employers log in here link to access Employer Self-Service.

Step 14 -- Log in to Employer Self-Service using your new password.

Once you have successfully logged into ESS, the Home screen displays. From the home screen you can navigate to the various screens of ESS by using the drop down menus at the top of the screen.

You are required to submit a monthly report with details and associated payments to TCRS. There are two methods to accomplish this – with a file adhering to the prescribed TCRS layout or by manually entering information using the Enter Report Details screen. Typically large employers (i.e., more than 100 employees) use file submission and smaller employers use the Enter Reports Details screen. This setting is selected by TCRS in Concord. You must contact TCRS to change the method of reporting. Employers may report for multiple department codes within one file. Employers submitting payment on behalf of another employer may only submit one summary for all employers for whom they remit payments.
Outstanding credit invoices are automatically applied to the monthly report if the amount of the credit invoice is not greater than the total amount due on the monthly report. If the amount of the credit invoice is greater than the amount due on the Summary screen, then the credit invoice will not be automatically applied.
Debit invoices may be manually applied to the monthly report. These reports consist of a details summary, payment information, and payment account information.
6.1. Submitting a Monthly Report with a File Template
Note: This only applies to those submitting a file. If the employer is submitting via online entry, go to Section 6.3, Submitting a Monthly Report using Report Details.
In order for employers to submit a monthly report, the appropriate monthly reporting template must be present. These templates serve as the starting point for an employer’s contribution report. Templates include the summary information for all employers and detail information for employers that us the Enter Report Details module of ESS. Templates are generated automatically on the 25th of each month for all active employers whose prior month report is in POST status. POST indicates that the previous month’s report is posted to TCRS’ records. Once the current month’s template is available, you can begin the monthly reporting process.
Using the template, you must upload and submit a file that meets the Concord naming conventions. If the file is rejected during the Load process, an alert is sent by email to you. If the file is accepted, the Edit validation process begins to run the submitted date. If 10% of the file or 500 records are in ERROR status, an email is sent to your primary reporting official alerting them that the file was rejected due to too many edit errors.
Note: These errors must be corrected in the employer payroll system before the file is accepted via ESS. Files that reject must be resubmitted.
Step 1 -- To navigate to the Submit Monthly Report screen, click on the following menu options: Report > Submit Monthly Report
Note: If an employer is switching from manually entering details to uploading a file, they will be required to go through a file validation process with TCRS prior to submitting their first monthly report.

Step 2 -- Click the Report Month link corresponding to an individual summary.

Step 3 -- The
Monthly Reporting Checklist screen displays. Click ![]() at the bottom of the screen.
at the bottom of the screen.

Step 4 -- The Contrib. Details screen of the wizard displays.

Step
5 -- Click
![]() .
.

Step 6 -- Select the appropriate file.
Step
7 -- Click
![]() .
.
Note: If you submit a file with an incorrect file name or extension, the following message displays: “Detail file does not meet the proper naming conventions.” If the file you submit is too large the following error message displays: “Detail Files cannot exceed 2 MB. Files exceeding 2 MB can be zipped before they are uploaded.”

Step 8 -- The file is processed. You receive an email when the file has been processed by the Concord Load batch.
Note: If an unforeseen error occurs during the load process, the file may need to be uploaded manually. To proceed with the file upload, contact TCRS. A staff member will be able to change a setting within Concord.
Step 9 -- Once the file has been processed by TCRS, navigate to the Contribution Details screen of the wizard from the Submit Monthly Report screen. After the file has been accepted, the employer can review the feedback provided by TCRS in the Load and Edit batches. The Contribution Details screen provides you with a summarized view of the file history, file batch status, and where errors occurred.
Note: This screen does not display what the errors are; it displays a total count of the errors by category.

Step 10 -- If there were any errors with the file, these errors must be corrected before submitting your payment. Click the employer’s name link to access the errors.

Note: If your file contains load errors, these errors will display as a grid below Employer Details as seen below.

Step 11 -- Each record that contains an error is highlighted in yellow. Click the name of the member associated with the error record to access the detail information.

Step 12 -- The Member Contribution screen displays with the associated error message that details what needs to be corrected.

Step 13 -- Update the detail information for the record.

Step 14 -- Click
![]() at
the bottom of the screen to update the entry.
at
the bottom of the screen to update the entry.

Step 15 -- Continue to do so for each record with an error.

Step 16 -- Once
all errors have been addressed, click ![]() .
If all external errors have been addressed, the row will no longer be
considered in error.
.
If all external errors have been addressed, the row will no longer be
considered in error.

Step 17 -- When the file is approved, the user will receive the automated email. After the updated data is reviewed, you must verify that the summarized report information is correct.
Note: Records in the Errors column should equal zero for all Employer Details batches.
Step 18 -- Click the Submit Details button.

Step 19 -- Click
![]() .
.

Step 20 -- The Report Summary screen displays. After the summary payment has been verified, small changes can be made and debit and credit invoices can be applied. Then the payment must be remitted. The employer is presented with a finalized list of all costs for the month, including any credits and debits that may have resulted from applied invoices. The total amount due must be allocated amongst the employer’s various payment accounts prior to submission of the finalized reports.
Note: Updates (e.g., salary, EECON, or ERCON) within the 5% threshold are allowed. If there are updates outside of the 5% threshold, an error message displays when the summary is saved. If needed, you can select to apply any debit invoices. Follow step 21 to apply debit invoices. If no debit invoices need to be applied, continue to step 22. Credit invoices are automatically applied if the amount of the credit is less than the total of the report.

Step 21 -- Select the Apply check box to the left of the debit invoice that needs to be applied.

Step
22 -- Click
![]() to
submit the summary.
to
submit the summary.

Step 23 -- The Remit Payment screen displays. Review the total amount due for the report and any associated invoices that have been applied to the report.
Note: All health insurance support invoices for LEAs are automatically applied to an employers report if it exists for the current reporting month.

Step 24 -- Click the Edit link under the Remit Your Payment section to allocate the proper amount of payment.

Step 25 -- Allocate the proper amount of the payment to the appropriate bank accounts.

Step
26 -- Click
the Save link to the right of the Amount field where you
allocated payment.
Note: If you are paying via eCheck rather than EFT, a Check No.
field will populate to the right of the bank account in the Pay From grid.
You will be required to enter a check number in this field before proceeding.

Step 27 -- Once the balance remaining is equal to zero, enter your PIN.
Note: All costs must be paid in full. No partial payments are allowed.

Step 28 -- Click
![]() .
.

Step 29 -- The
Finalize Report screen displays. Click ![]() .
The payment summary screen displays, detailing the funds transmitted to
TCRS.
.
The payment summary screen displays, detailing the funds transmitted to
TCRS.

6.2. Partially Submitted Files
In some instances, only one batch from an uploaded file may be rejected. Instead of rejecting the entire file, ESS will only reject the batch that exceeded the error threshold. Follow the steps below to correct and submit a partially rejected file.
Note: Should you have to return to a previous step, the information on those pages will be displayed in read-only format.
Step 1 -- Follow steps 1 through 4 of Section 6.1, Submitting a Monthly Report with a File Template to navigate to the Contributions Details screen.
Step 2 -- On the Contribution Details screen, a list of all partially accepted or rejected files displays. If the file is partially accepted, at least one of the batches in the file has passed the necessary Load and Edit validations, but at least one batch is in either a REJT (Load) or ERJT (Edit) status. You must correct the issues with the file and resubmit a full file, including batches that have already been successfully processed. Only the batches that were initially rejected will be processed at the time.

Step 3 -- If the file is rejected, you must return to the Upload screen and resubmit the entire file. The entire file is processed by the Load and Edit batches.
6.3. Submitting a Monthly Reporting using Report Details
Note: This functionality only applies to those submitting via online entry. If the employer is submitting via file, refer to Section 6.1, Submitting a Monthly Report with a File Template.
Submitting reports via online entry is done through a wizard format. If there are any errors in information entered on the Enter Detail Reports screen, an error message displays, and you must correct files before submitting. .All details must be submitted and corrected before you can confirm your monthly summary. The monthly summary must be confirmed before a payment can be remitted and the report can be finalized. Once the payment is submitted, the report is ready for processing by TCRS.
Note: If a report has been submitted and you have to return to a previous step, the information on those pages will be displayed in read-only format.
Step 1 -- To navigate to the Submit Monthly Report screen, click on the following menu options:
Reporting > Submit Monthly Report

Step 2 -- Click the Report Month link.

Step
3 -- The
View Monthly Reports screen displays. Click ![]() .
.

Step 4 -- The Contrib. Details screen displays. Click the employer name link to select the record you want to update for the monthly report.
Note: You may only see your organization’s records listed on this screen unless your organization reports for another employer.

Step
5 -- Click
![]() to
edit the Salary and Service fields within detail record. To edit the entire
record, please refer to Steps 11 – 14 within the Submitting a Monthly
Report with a File Template section above.
to
edit the Salary and Service fields within detail record. To edit the entire
record, please refer to Steps 11 – 14 within the Submitting a Monthly
Report with a File Template section above.
Note: You can also add new employees
or delete existing employees by clicking ![]() .
.

Step
6 -- Click
![]() to
save the record row.
to
save the record row.
Note: After you save the record row, the record goes through the validation process automatically. If there are errors, you are immediately notified of them and prompted to correct them.

Step 7 -- Repeat steps 4 through 6 for all records that require updating.
Note: You can also update prior period
information by using the ![]() functionality. Adding
a line item prompts you for the member’s SSN as well as the posting month
for update. If a member record is returned, you can then update an existing
record or add a new record for the same time period. If a member record
is not returned, you can enter a new record for the member in a retroactive
status.
functionality. Adding
a line item prompts you for the member’s SSN as well as the posting month
for update. If a member record is returned, you can then update an existing
record or add a new record for the same time period. If a member record
is not returned, you can enter a new record for the member in a retroactive
status.
Step
8 -- Click
![]() to
return to the Monthly Reporting wizard.
to
return to the Monthly Reporting wizard.

Step 9 -- Follow steps 16 through 29 of Section 6.1, Submitting a Monthly Report with a File Template, to complete submitting the report.
File submitters will have to add a line item when they have records rejected on load or when they are making prior period adjustments. For those employers using enter report details, you will have to add a line item when you have a new employee to report or when you have a prior period adjustment.
Step 1 -- Follow steps 1 through 4 of Section 6.3, Submitting a Monthly Reporting using Report Details.
Step
2 -- Click
![]() . The
Add Member Contribution screen displays.
. The
Add Member Contribution screen displays.

Step 3 -- Enter the member’s SSN and the posting month of the entry.

Step
4 -- Click
![]() .
.

Step 5 -- The Member Contribution screen displays. Enter any updates to the member information. Click Submit.

The monthly packet is similar to today’s turnaround document. A monthly packet must be generated before you can submit your file for the current month.
Monthly packets are generated on the 25th day of each month. Once the monthly packet is generated, the primary reporting official is alerted via email that the packet is ready to view. A monthly packet will not be generated if there are no error reports generated. Administrative and employer reporting users can view reports and correspondence that are a part of the monthly packet.
Monthly packets display if there is content included or at least one report given for a month. These packets are comprised of a Monthly Packet Alert Email and several reports including:
· Leave Without Pay Report
· Demographic Errors Report
· Missing Employment End Date Report
· Non-Participating Status Report
· Errors Not in Template Report
Step 1 -- To navigate to the Monthly Packets screen, click on the following menu options:
Report > Monthly Packets

Step 2 -- Select the fiscal year and / or month from the drop down menus.

Step 3 -- All monthly packets for the year and / or month displays.
Note: If no packet was generated, then no documents display.

Step 4 -- Click the link to view a PDF of the monthly packet.

Step 5 -- Click to view the PDF of the monthly packet.
![]()
Step 6 -- The PDF of the monthly packet displays.

You can use the Download Member IDs screen to download the member ID for a particular name or for a set of members using search criteria. You can search by:
· Newly Created Members
· Date of Employment
· Report Month
· SSN
You can download the file and import it into your payroll to populate the member ID field. Currently, reporting member IDs within the monthly file is optional.
It is the employer’s responsibility to download new employee’s member IDs. TCRS suggests the following process: Prior to the submission of the monthly employer report, use the Member ID screen to produce a list of the new member IDs for the previous month’s Employer Report. By waiting until just prior to submitting the current employer report, the employer retrieves the most up to date list of member IDs. Employers cannot download a member ID for a new employee who has not worked for an employer covered by TCRS.
Note: If you manually enter monthly reporting details, member IDs do not need to be downloaded via this screen for new employees. The new employee’s member ID automatically displays on the Enter Reporting Details screen.
Step 1 -- To navigate to the Download Member ID screen, click on the following menu options:
Report > Download Member ID
Step 2 -- Select the method by which to search for a new employee from the Search By drop down menu. The options include:
· Newly Created Members
· Date of Employment
· Report Month
· SSN
Step 3 -- Enter the appropriate search criteria into the field(s). Search criteria for each Search By option are as follows:
· Newly Created Members
o Note: No fields are displayed for this selection. The list generated for this search option allows you to build a list of members who have been reported since the Download Member ID file was last generated
· Date of Employment
o Start Date (mm/dd/yyyy)
· Report Month
o Report Month
§ Month
§ Year
· SSN
o SSN

Step
4 -- Click
![]() .
.

Step 5 -- The members who match your search criteria display at the bottom of the screen. You can either select the check box next to the member you want to add or click the Select All link to select all the members that display.

Step
6 -- Click
![]() .
.

Step 7 -- Click the Download Members link.

Step
8 -- The
Download Member ID screen displays. Click ![]() .
.

Step
9 -- The
member ID file is downloaded to your computer as a .txt file. Click ![]() to
view the file.
to
view the file.
Note: The .txt file contains only those members you selected in Step 5.
![]()

8.1. Member Plan Search (to determine Hybrid Plan or Legacy Plan)
You can use the Member Plan Search within the Download Member ID screen to verify which plan a new hire should be enrolled. You can search by:
· SSN
· Member ID
The Member Plan Search verifies the member’s information based on the Hybrid Plan and Legacy Plan membership rules.
Step 1 -- To navigate to the Member Plan Search screen, click on the following menu options: Report > Download Member ID

Step 2 -- Select the method by which to search for a new employee from the Search By drop down menu. The options include:
· SSN
· Member ID

Step 3 -- Type in the member’s information and click the Show button.
Step 4 -- The plan determination will display.
Invoices generated by TCRS display in the Process Invoices screen for administrative and employer reporting users to view and pay. From this screen, you have the option of remitting payment for invoices outside of the monthly reporting process.
Note: Credit invoices do not display on the Process Invoices screen.
To pay an invoice, follow the steps below.
Step 1 -- To navigate to the Invoices screen, click on the following menu options:
Report > Invoices

Step 2 -- The most recent unpaid invoices display on the screen. Invoices with a status of Cancel or Write Off do not display here.
Note: If you want to view both paid and unpaid invoices, select the Show All Invoices check box. Search for an invoice by recent invoices or by date range.
Note: Employers who have a different balancing employer than themselves will not see monthly reporting.
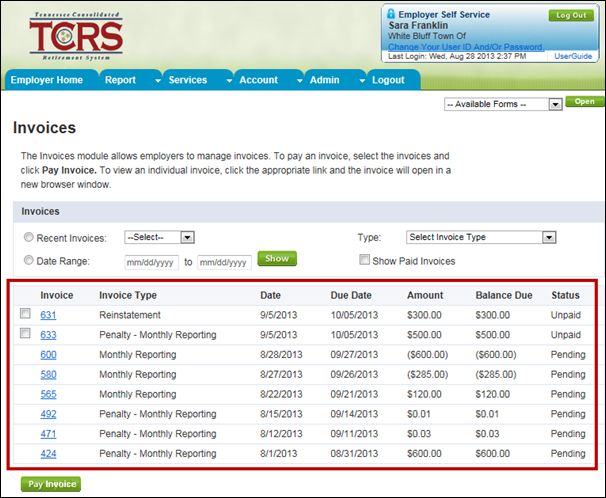
Step 3 -- Select the check box to the left of the invoice that you want to pay.

Step 4 -- Click
![]() .
.

Step 5 -- Click the Edit link to apply payments to the invoice.

Step 6 -- Enter the amount to be paid. You can also add a new payment account to pay the invoice. See Section 18.1, Adding a Payment Account.
Note: The amounts should add up to the total amount due.

Step 7 -- Click the Apply link.
Note: If amounts do not total, then the following message displays: “Total Amount Allocated must be equal to the Total Amount Due”

Step
8 -- To
continue, click ![]() .
.
Note: Click ![]() to
cancel the invoice process.
to
cancel the invoice process.

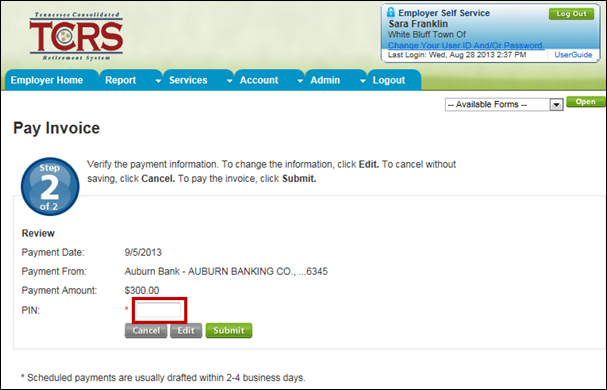
Step 9 -- Verify the payment details, and then enter your PIN number.
Note: To process an invoice, you must enter a valid PIN. If you do not enter a valid PIN, you will be unable to process the invoice.
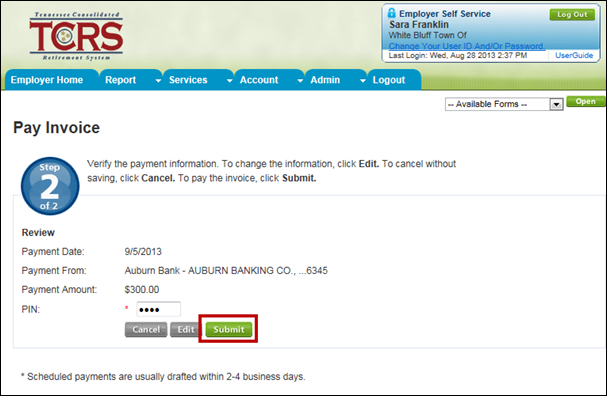
Step
10 -- Click
![]() to
submit the invoice.
to
submit the invoice.
Note: You can only submit the invoice
if the total amount due for the select invoice is equal to the total payment
applied. Click ![]() to
cancel the invoice process.
to
cancel the invoice process.
9.2. Adding a New Payment Account
While paying an invoice, you can also add a new payment account.
Note: A new payment account can be added from the home screen without having to access the Invoices screen of ESS. Refer to Section 9, Invoices for further instruction.
Step 1 -- Follow steps 1 through 4 from Section 9.1, Paying an Invoice.
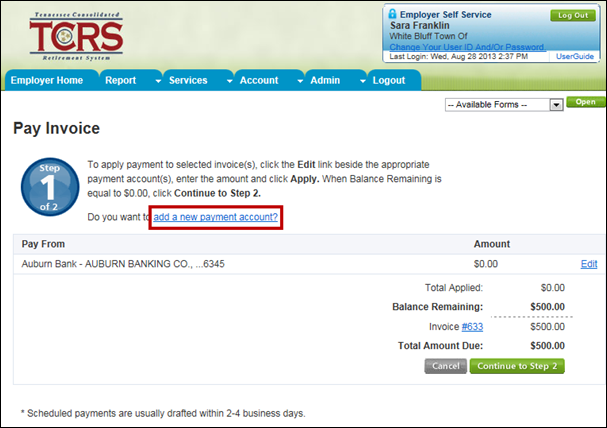
Step 2 -- On the Pay Invoice screen, click the Add a new payment account link.
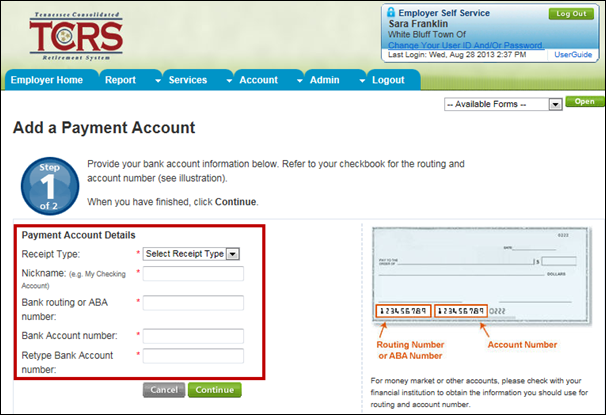
Step 3 -- The Add a Payment Account screen displays. Enter the new payment account information.
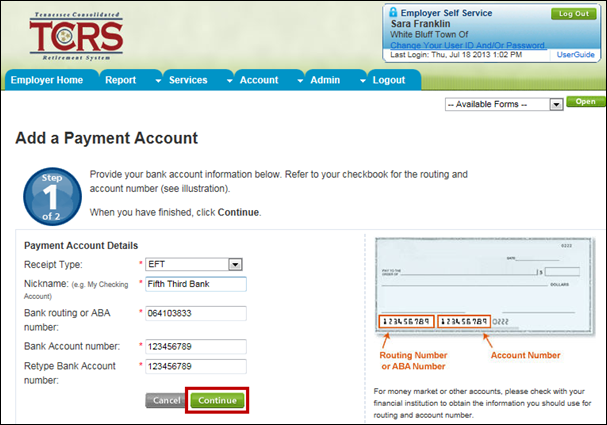
Step
4 -- Click
![]() .
.
Step 5 -- Enter your PIN in the corresponding field.
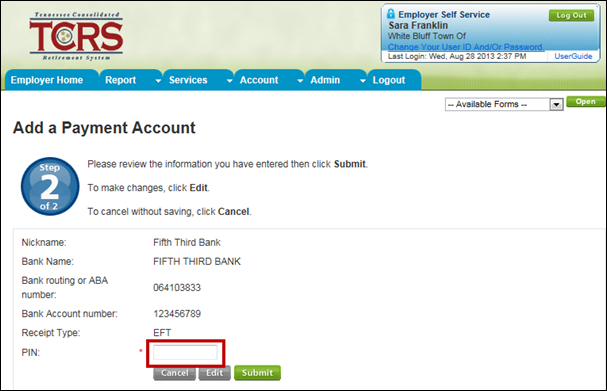
Step 6 -- Click
![]() . The
new payment account is added to ESS.
. The
new payment account is added to ESS.
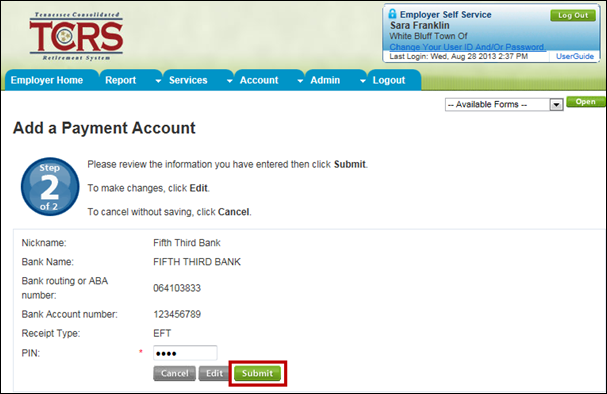
Step 7 -- To complete the pay invoice process, complete steps 5 through 9 in Section 9.1, Paying an Invoice.
While paying an invoice, you can edit certain payment details.
Note: A payment account can be edited from the home screen without having to access the Invoices screen of ESS. Refer to Section 9, Invoices for further instruction.
Step 1 -- Follow steps 1 through 5 of section 9.1, Paying an Invoice.
Step
2 -- Click
![]() to
edit the payment details.
to
edit the payment details.
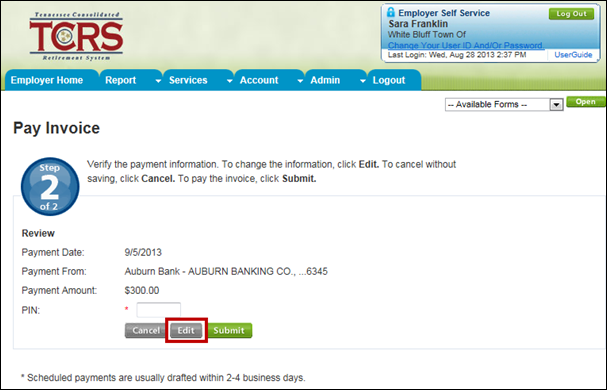
Step 3 -- Click the Edit link to modify the payment information.

Step 4 -- Follow steps 6 through 10 of Section 9.1, Paying an Invoice.
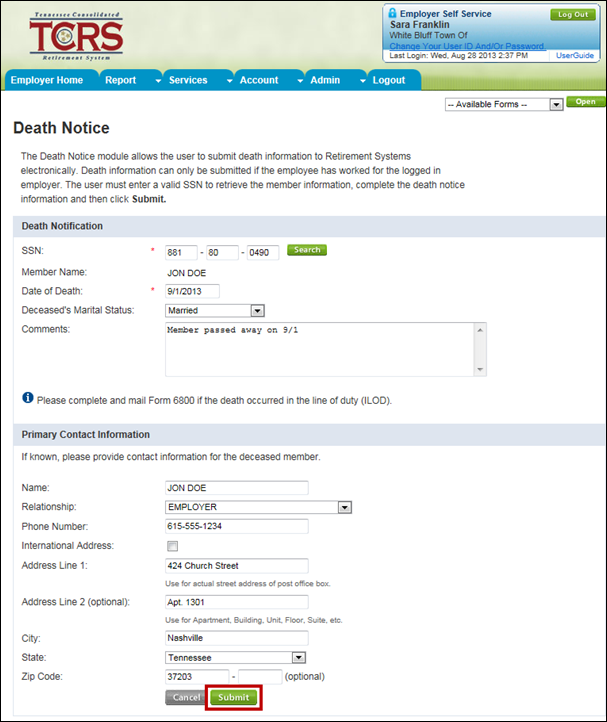
All those with ESS access (administrative, employer reporting, and staff) can use the Death Notice screen to report an employee’s death. Information submitted here generates a workflow for the appropriate TCRS staff person to work.
Note: As the representative of a specific employer, the ESS staff member may only report the deaths of those individuals who were active or retired members of the employer’s retirement system. The SSN entered in this process is compared to the enrollments for the member. If the member does not have an active or inactive enrollment with the organization, then the death cannot be reported.
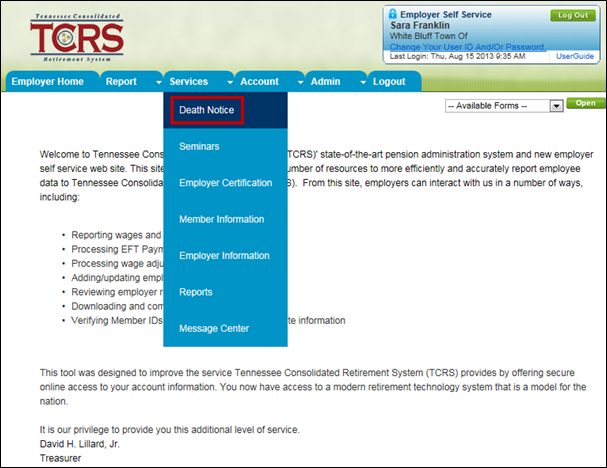
Step 1 -- To navigate to the Death Notice screen, click on the following menu options:
Services > Death Notice
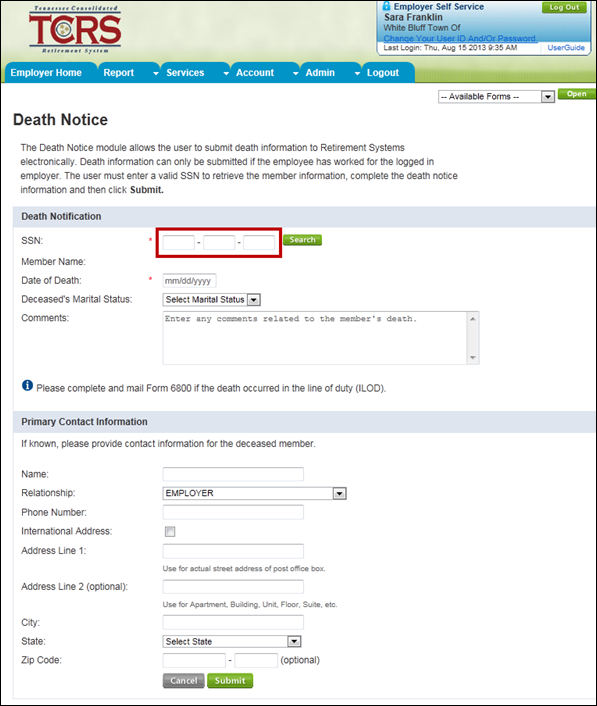
Step 2 -- Enter the deceased employee’s SSN.
Step
3 -- Click
![]() .
.

Step 4 -- The employee’s information displays. Enter the death related information.

Step 5 -- Click
![]() . The
Active Death Processing workflow launches in Concord for TCRS to process.
. The
Active Death Processing workflow launches in Concord for TCRS to process.
All those with ESS access (administrative, employer reporting, and staff) can sign up for a TCRS-sponsored seminar through the Register screen.
11.1. Registering for a Seminar
You can register yourself or others from your organization, even those without ESS access, for a TCRS-sponsored seminar.
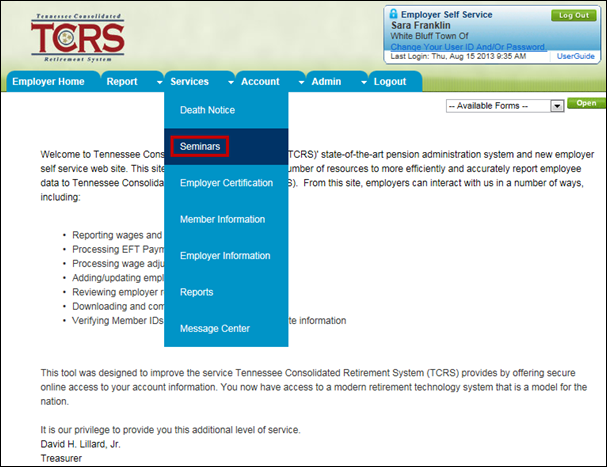
Step 1 -- To navigate to the Seminar screen, click on the following menu options:
Services > Seminars
Step 2 -- To find upcoming seminars with available seats you can either select an option from the Upcoming Dates drop down menu or enter information in the Date Range or Filter fields.
Note: The Seminars screen defaults to display all upcoming seminars.
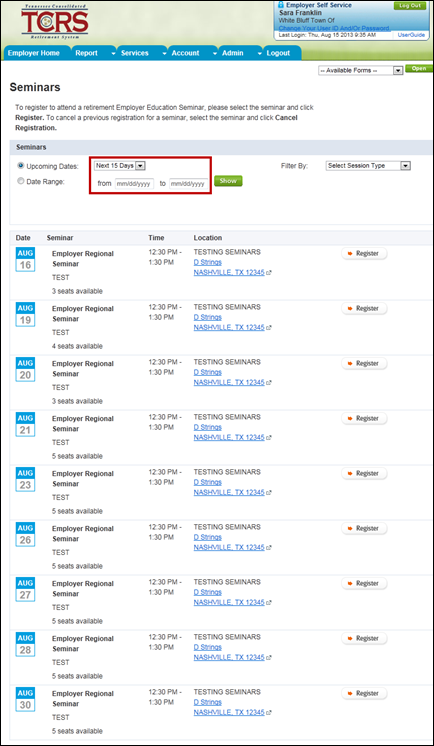
Step 3 -- All
seminars with available seats that meet your search criteria display.
Click ![]() next
to the seminar for which you want to register.
next
to the seminar for which you want to register.

Step 4 -- The Seminar Registration screen displays. Enter the number of attendees for this seminar.
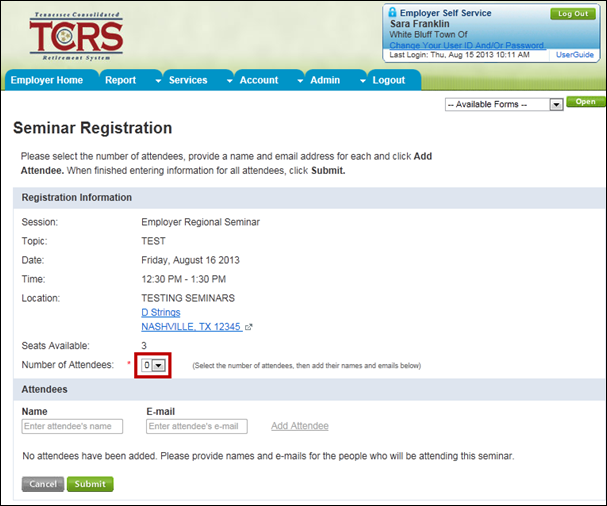
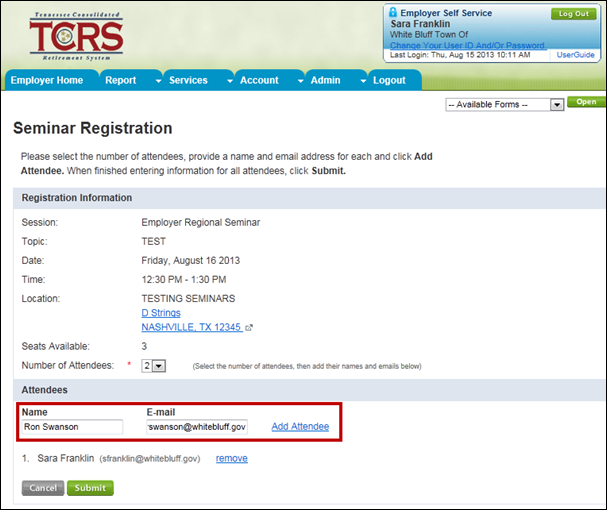
Step 5 -- Enter the Name and E-mail address of an attendee in the corresponding fields.

Step 6 -- Click the Add Attendee link.
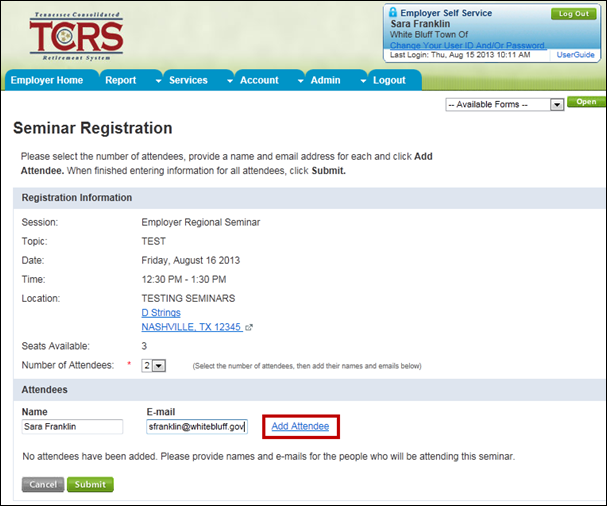
Step 7 -- Repeat steps 5 and 6 for each attendee.
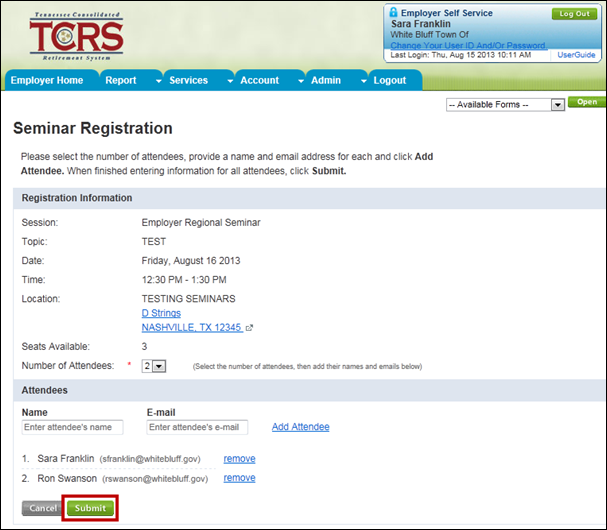
Step 8 -- Click
![]() . A
confirmation message displays at the bottom of the screen to confirm that
you successfully registered for the seminar.
. A
confirmation message displays at the bottom of the screen to confirm that
you successfully registered for the seminar.
11.2. Removing Attendees for a Seminar
If you or another staff member can no longer attend the seminar, you can remove yourself or them as an attendee.
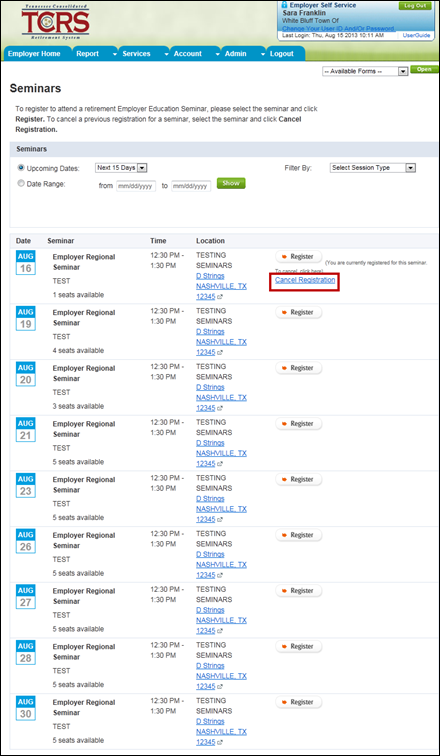
Step 1 -- From the Register screen, find the seminar from which you want to remove attendees.

Step 2 -- Click the Cancel Registration link next to the attendee you want to remove from the seminar. The attendee(s) is / are removed from the seminar.
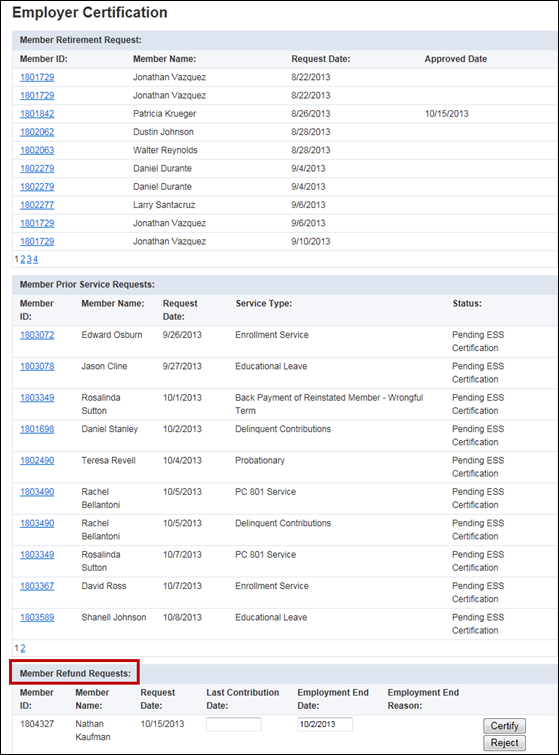
ESS allows employers to certify employee requests through the self service module instead of filling out and signing paper forms. A certification will only appear when an employee or former employee has initiated a request with TCRS for a retirement, refund, or service purchase. On the Certification screen, only certifications in pending status display. Administrative and employer reporting users can use the Certification screen to approve or reject these processes.
12.1. Certifying a Member’s Prior Service Purchase
Service Purchase requests are initiated by a member using either Member Self-Service or by submitting a form to TCRS. If the member submits the request via Member Self-Service, a request is automatically created in Concord. If the member submits the request using a form, TCRS staff must create a request in Concord. Once the request is created, it appears in Employer Self-Service for certification. After you have approved the Service Purchase request, TCRS staff completes the process using Concord.
Note: Service credit reported must be between 0 and 1.34 months. Service credit must be reported in allowable amounts. Service credit must be rounded to the nearest 1/8 of a month based on the member’s reported salary and rate of pay.
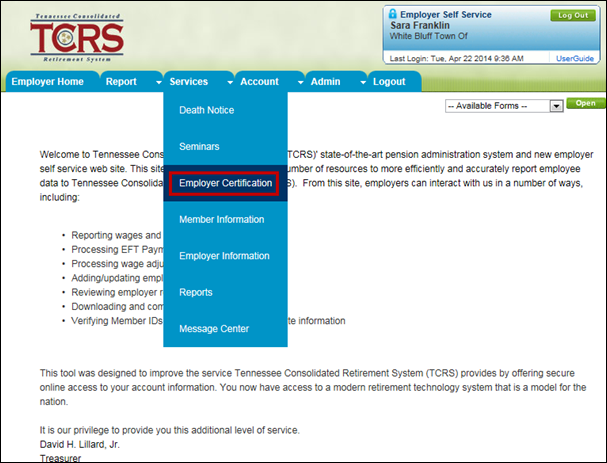
Step 1 -- To navigate to the Certifications screen, click on the following menu options:
Services > Employer Certification
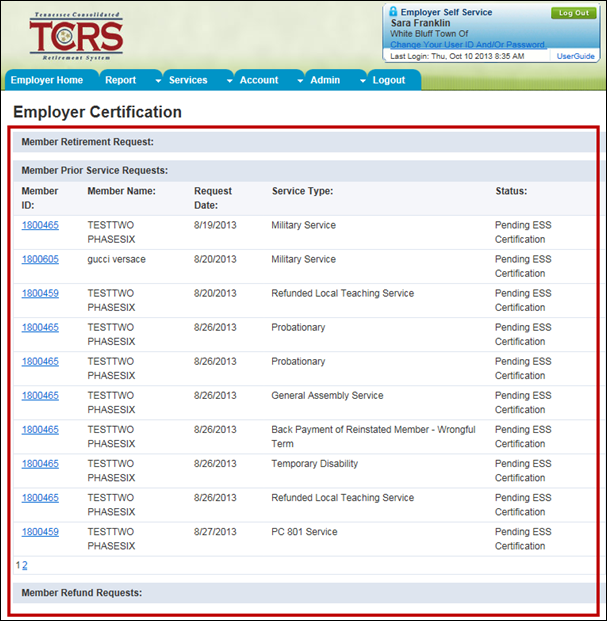
Step 2 -- All pending retirement, refund, and prior service purchase records display on the Certifications screen.
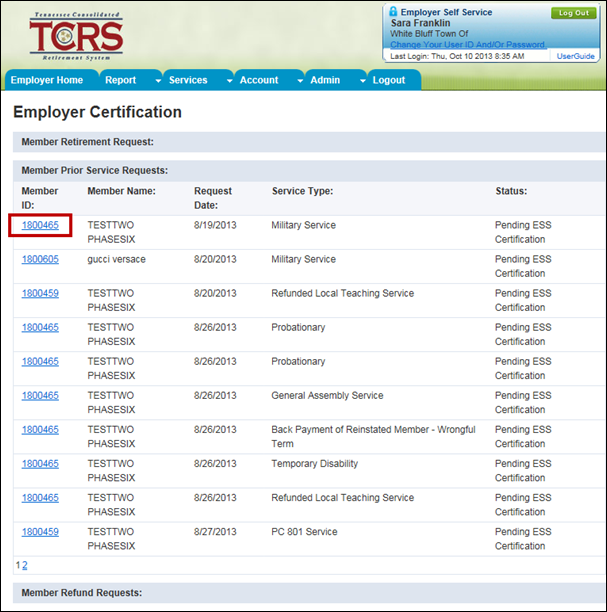
Step 3 -- Click on the member ID to view the prior service purchase information.
Step 4 -- To certify the prior service purchase, enter the start date and end date for the service purchase request or verify that the prepopulated information is correct.
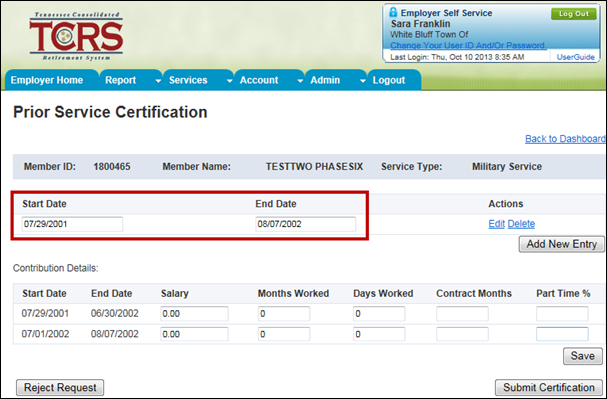
Step 5 -- Make any necessary updates based on the final salary breakdown.
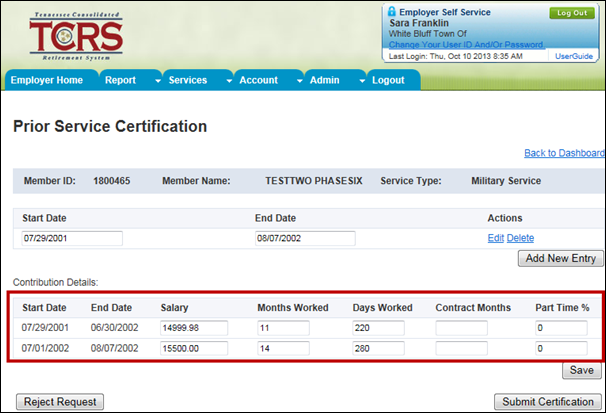
Step 6 -- Click
![]() .
.
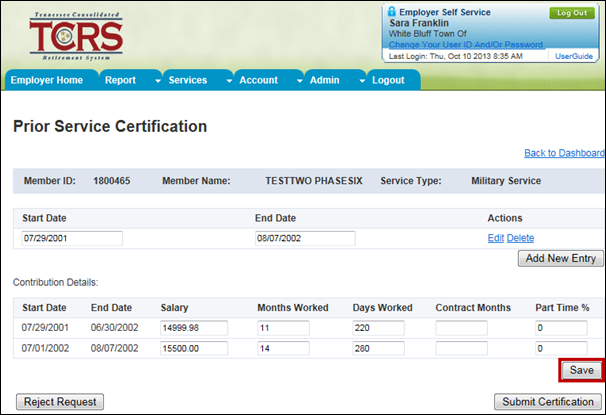
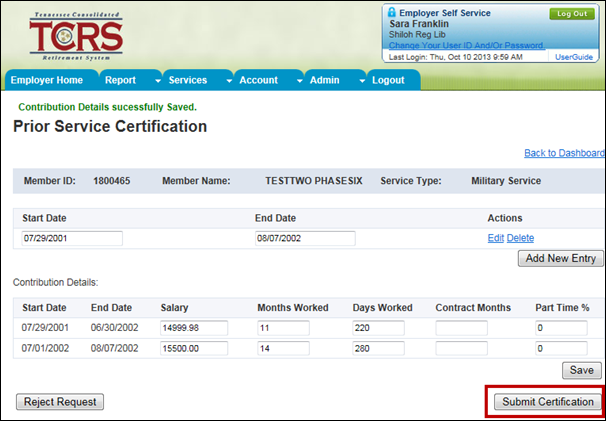
Step 7 -- Click
![]() to
submit the information to TCRS for additional processing.
to
submit the information to TCRS for additional processing.
Note: If the prior service purchase request should be rejected, follow steps in Section 12.4, Rejecting a Member’s Prior Service Purchase.
12.2. Certifying a Member’s Retirement
Retirement requests are initiated by a member using either Member Self-Service or submitting a retirement application to TCRS. If the member submits the request via Member Self-Service, a request is automatically created in Concord. If the member submits the request using a form, TCRS staff must create a request in Concord. Depending on the status of the application, it appears in ESS for approval. After you have approved the application, TCRS staff completes the process using Concord.
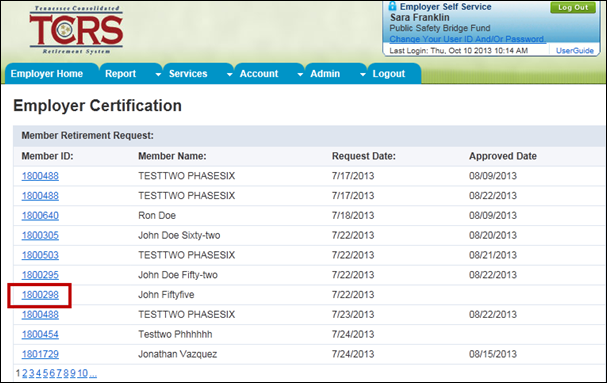
Step 1 -- All pending retirement, refund, and prior service purchase records display on the Certifications screen.
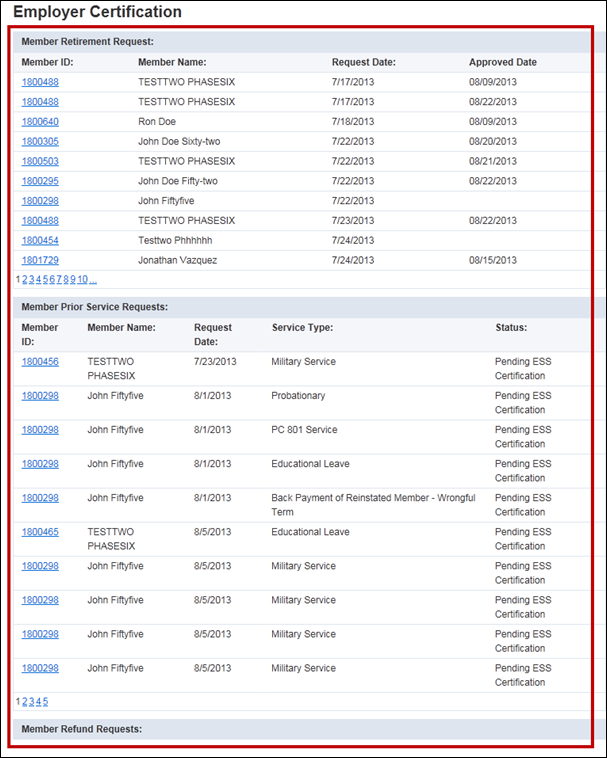
Step 2 -- Click on the member ID to view the retirement request information.
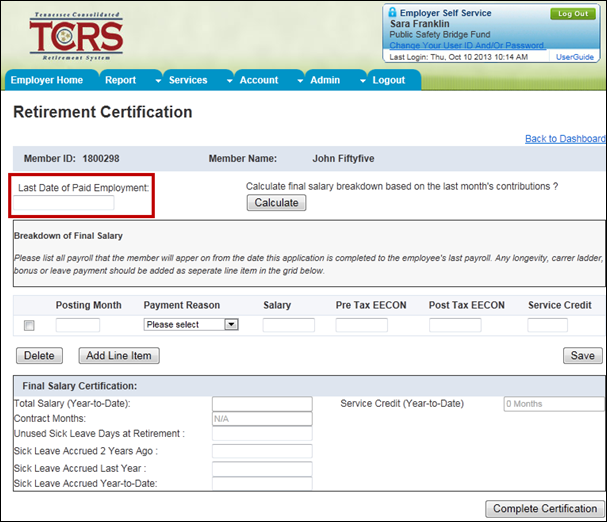
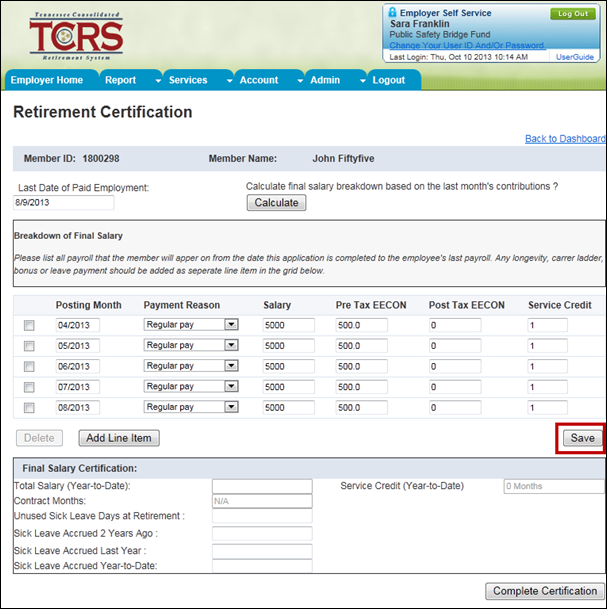
Step 3 -- To certify the retirement request, enter the last employment date in the Last Date of Paid Employment field.
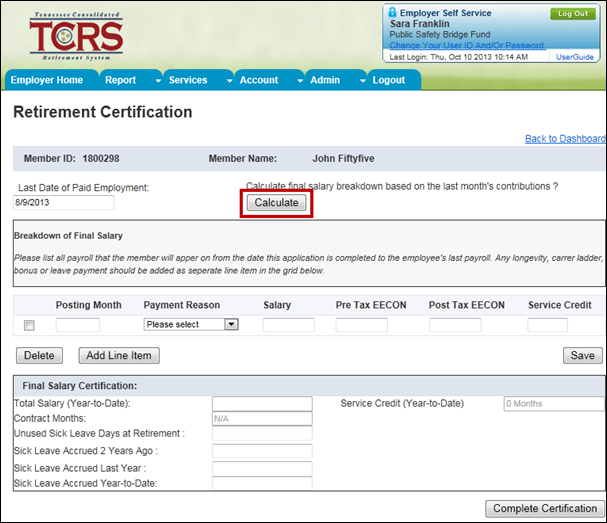
Step 4 -- Click
![]() .
.
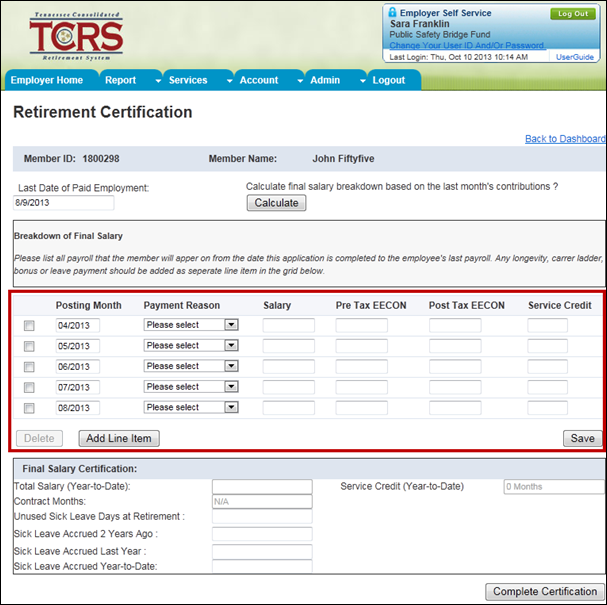
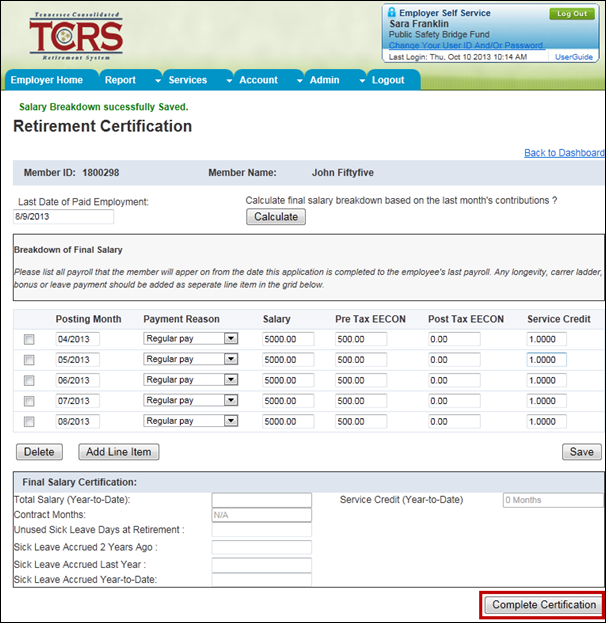
Step 5 -- Make any necessary updates based on the final salary breakdown.
Step 6 -- Click
![]() .
.
Note: If your agency has the sick leave plan provision and allows your employees to claim unused sick leave as retirement credit, please certify the unused sick leave on this screen.
Step 7 -- Click
![]() to
submit the information to TCRS for additional processing.
to
submit the information to TCRS for additional processing.
12.3. Certifying a Member’s Refund
Refund applications are initiated by a member using either Member Self-Service or submitting a refund request form to TCRS. If the member submits the request via Member Self-Service, a request is automatically created in Concord. If the member submits the request using a form, TCRS staff must create a request in Concord. Once the request information is processed by TCRS, you can view the refund request in Employer Self-Service. After you have approved the application, TCRS staff completes the process using Concord.
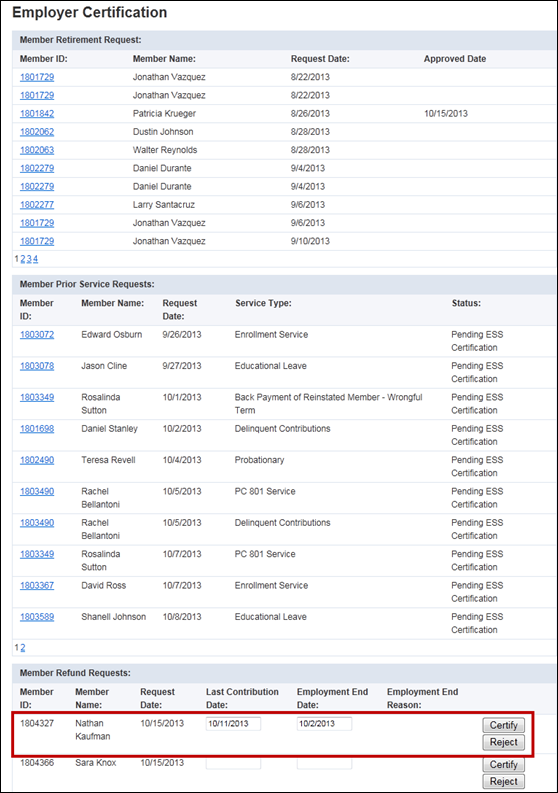
Step 1 -- All pending retirement, refund, and prior service purchase records display on the Certifications screen.
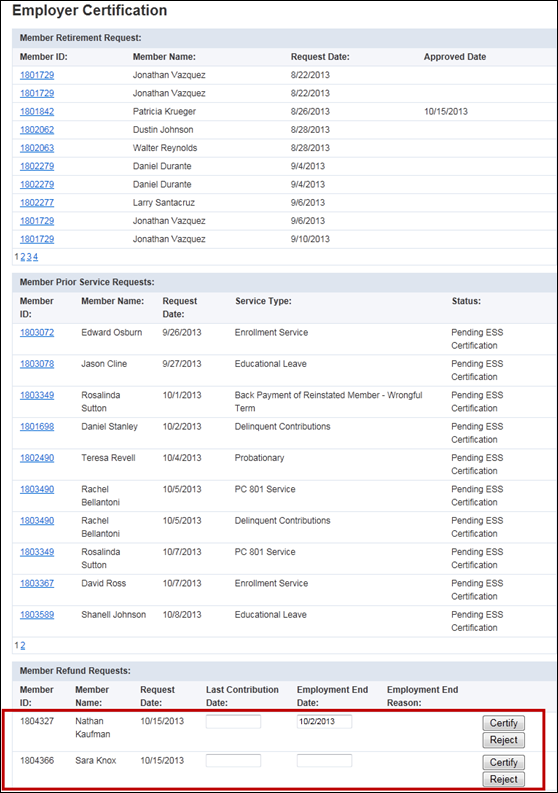
Step 2 -- To certify the refund request, enter the last contribution date and employment date for the member.
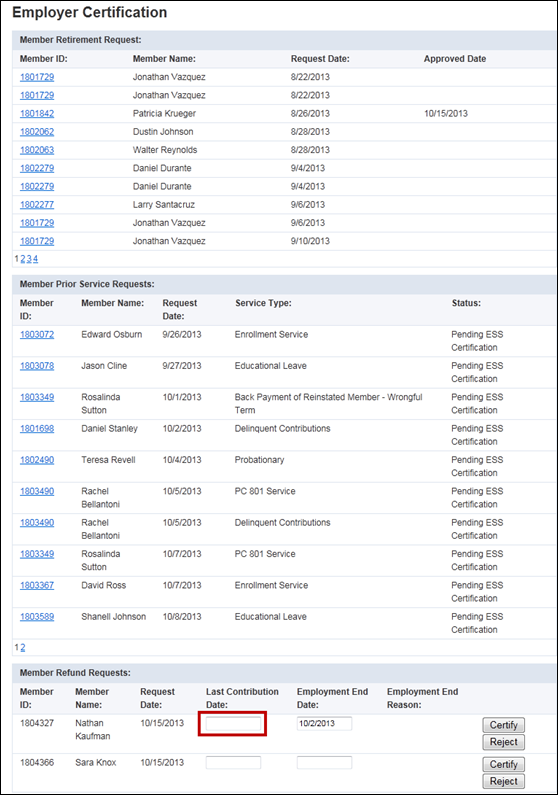
Step 3 -- Make any necessary updates.
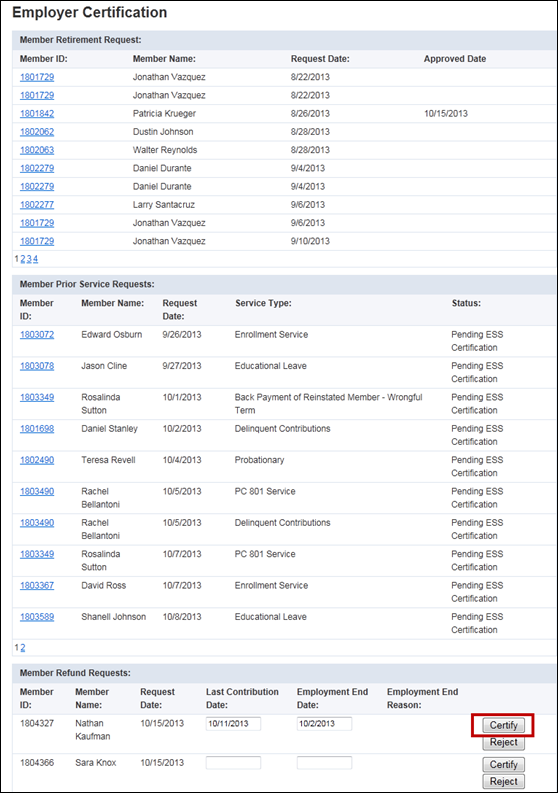
Step 4 -- Click
![]() to
submit the information to TCRS for additional processing.
to
submit the information to TCRS for additional processing.
Note: If the refund request should be rejected, follow steps in Section 12.5, Rejecting a Member’s Refund.
12.4. Rejecting a Member’s Prior Service Purchase
In some instances, you may need to reject a member’s Service Purchase request.
Step 1 -- Follow steps 1 through 3 from Section 12.1, Certifying a Member’s Prior Service Purchase.
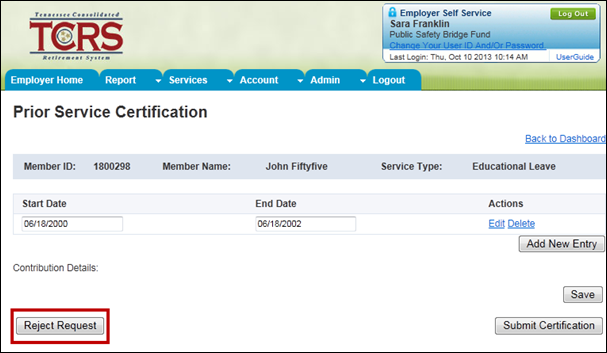
Step 2 -- If
the details for the prior service purchase request do not match your records,
click ![]() .
.
Step 3 -- The Confirmation window displays. Select the denial reason from the drop down menu.

Step
4 -- Click
![]() .
.

12.5. Denying a Member’s Refund
In some instances, you may need to reject a member’s Refund application. After you reject the member’s Refund application, a TCRS refund rejection workflow is created. This cancels the existing internal TCRS refund work item, creates an appropriate journal entry noting that the refund was cancelled, and sends the appropriate correspondence to the member alerting them of the refund cancellation.
Step 1 -- Follow steps 1 through 3 from Section 12.3, Certifying a Member’s Refund.
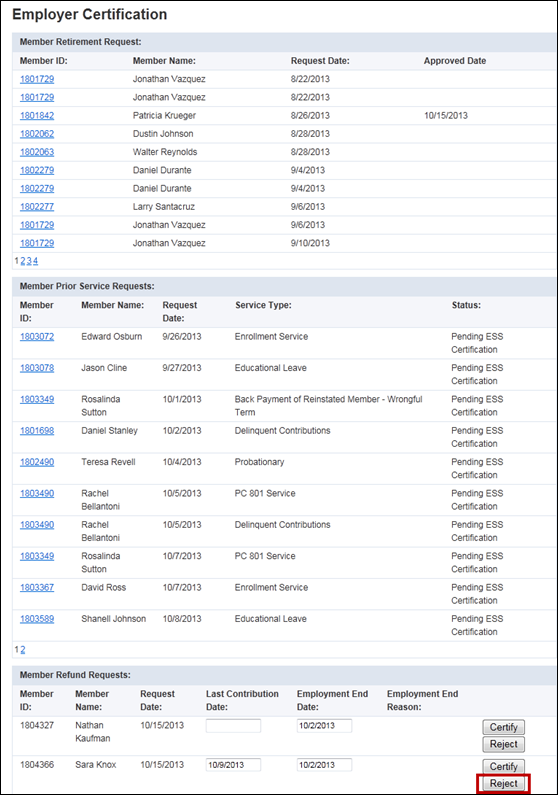
Step 2 -- If
the details for the refund request do not match your records, click ![]() .
.
Step 3 -- The record is removed from the Certification screen. A request is launched in Concord to cancel the correspondence refund work item. A journal entry is automatically created for the member in Concord and a letter is sent to the member notifying them of the refund cancellation. The request will no longer be reflected in ESS.
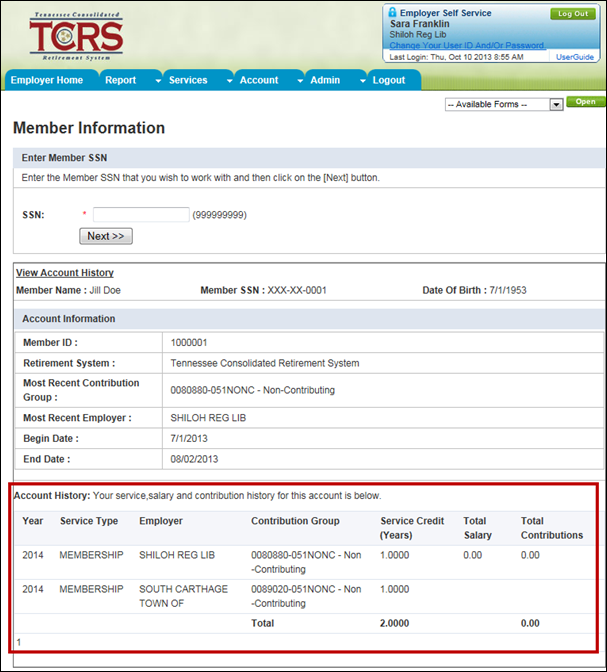
All those with ESS access (administrative, employer reporting, and staff) can view salary and contribution history information about selected members using the Member Information screen. You can use this information to counsel potential retirees on various aspects of the retirement process. You can view salary and contribution information for members who either currently work for or have worked for your organization in the past. If a member was employed with a different employer that is a part of TCRS, the member’s salary for that employer displays, but the fields are masked. Service information also displays on the Member Information screen.
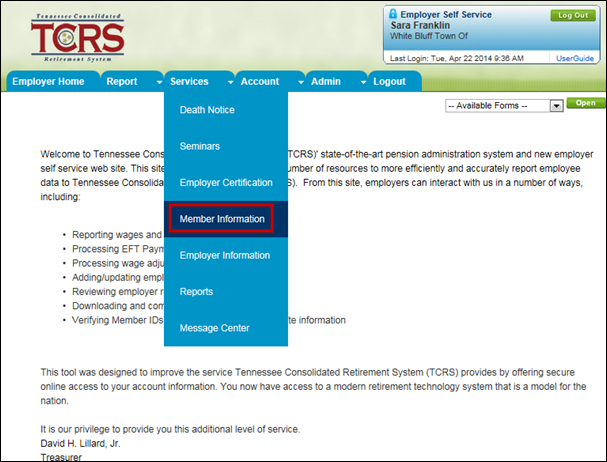
Step 1 -- To navigate to the Member Information screen, click on the following menu options:
Services > Member Information
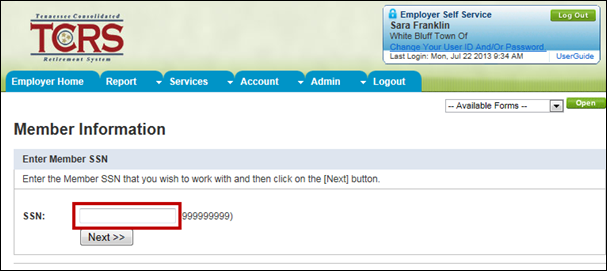
Step 2 -- Search for a member using their SSN. Enter the member’s SSN in the SSN field.
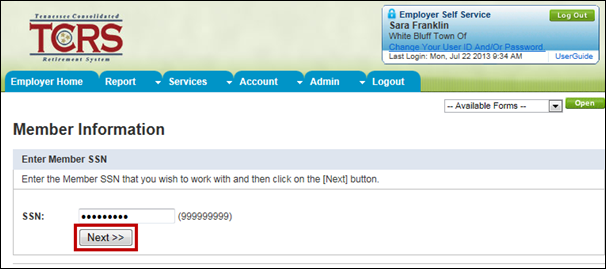
Step
3 -- Click
![]() .
.
Step 4 -- The member’s information displays.
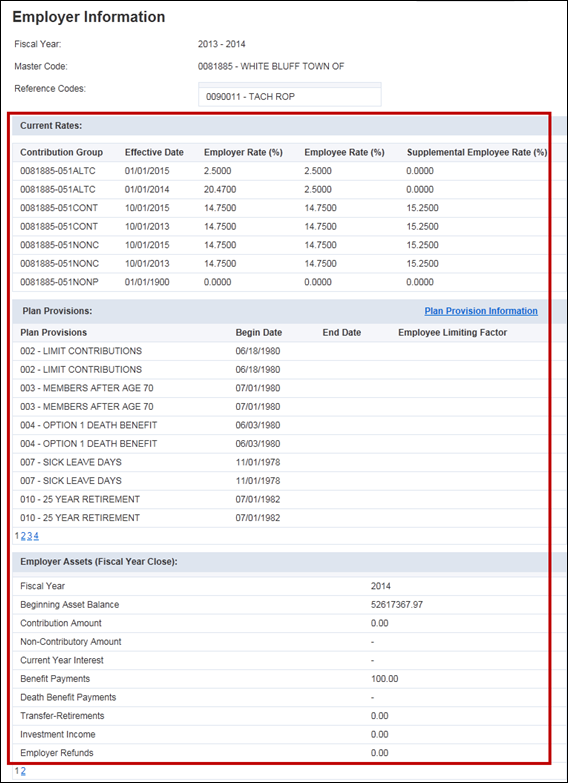
All those with ESS access (administrative, employer reporting, and staff) can view the Employer Information screen. This screen provides a snapshot of the most often requested information about their participation with TCRS, asset balance information, plan provisions, and contribution rates.
Note: Current fiscal year contribution rates display. When new fiscal year rates are loaded, they display on this screen even if the current fiscal year has not ended. Both rates display until the effective date of the new fiscal year rates. After the effective date of the new fiscal year rates, the old rates will no longer display. Asset balances only display for the current fiscal year.
Step 1 -- To navigate to the Employer Information screen, click on the following menu options:
Services > Employer Information
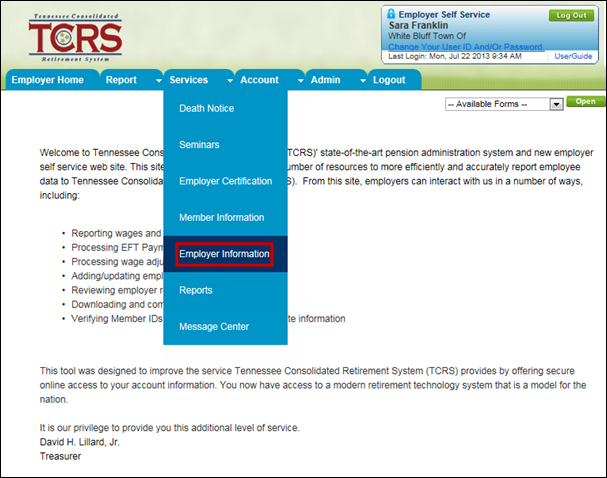
Step 2 -- All of your organization’s information displays on the screen as read-only. The information displayed includes: Current Rates, Plan Provisions, and Employer Assets (Fiscal Year Close) sections.
All those with ESS access (administrative, employer reporting, and staff) can use the Reports screen to generate specific reports in real-time outside of the monthly packet batch process on an ad-hoc basis. Additionally, Employer Annual Statements are available on the Reports screen at the end of each fiscal year.
Note: If your organization reports for or balances for another employer, you have the ability to view those employer codes in the Employer Code drop down menu in the Reports screen. If your organization is reported for or balanced for by another employer, you can only view your own employer code from the Employer Code drop down menu.
Step 1 -- To navigate to the Reports screen, click on the following menu options:
Services > Reports
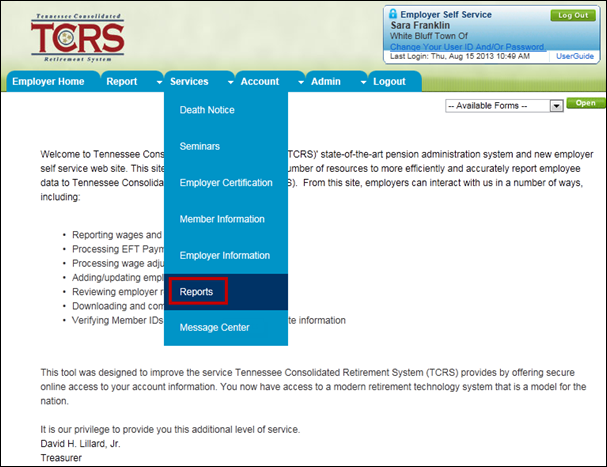
Step 2 -- Select the report from the drop down menu.
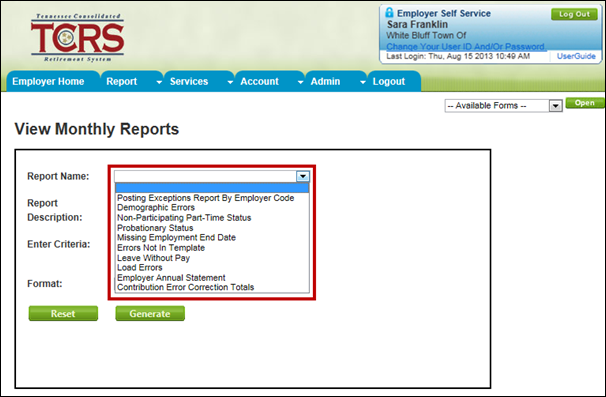
Explanation of Fields
The following table describes the reports available on the View Monthly Reports screen.
Field Name |
Attribute |
Description |
|
ESS Reports |
|
||
Posting Exceptions Report By Employer Code |
V |
This report displays a list of an employer’s Edit errors grouped by member |
|
Demographic Errors |
V |
This report lists all demographic errors for a reporting month for an employer |
|
Non-Participating Part-Time Status |
V |
This report lists all part-time employees who are non-participants with TCRS |
|
Probationary Status |
V |
This report displays employees who have been on Probation for 5 or more months |
|
Missing Employment End Date |
V |
This report displays employees whose employment end date is not recorded with TCRS |
|
Errors Not In Template |
V |
This report displays errors that have occurred that are not in the template |
|
Leave Without Pay |
V |
This report displays a list of employees who are currently on leave without pay |
|
Load Errors |
V |
This report displays a summary of all errors, warnings, and informational messages that were identified as part of the load edit process |
|
Employer Annual Statement |
V |
This report displays the asset balance details for an employer and a fiscal year |
|
Contribution Error Correction Totals |
V |
This report will be populated from the originally received data and any changes made to that data by either the employer or internal TCRS users |
|
Attribute Key: R = Required, O = Optional, C = Conditional, V = View Only
Step 3 -- The report description displays for the selected report. Enter search criteria for the report.
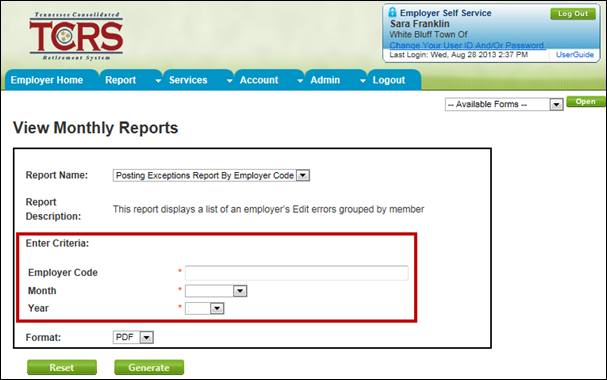
Step
4 -- Click
![]() .
.
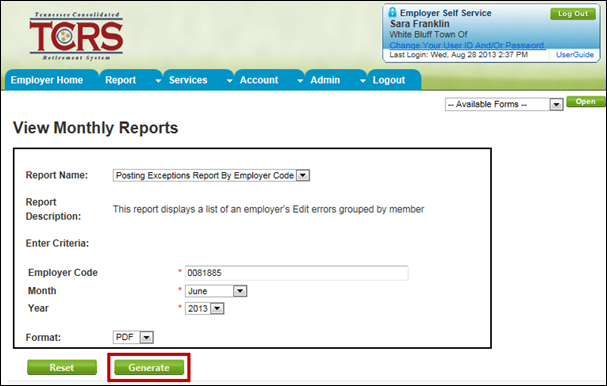
Step 5 -- A PDF of the report downloads. Either open it or save it to your desktop.
![]()
All those with ESS access (administrative, employer reporting, and staff) can view the Message Center screen. The Message Center screen displays all correspondence sent (as attachments) from TCRS to a specific user’s inbox. Correspondence items sent to the Message Center screen are only available for 90 days. After 90 days, the messages are automatically deleted. You can flag messages in the Message Center screen as important. If a message is flagged as important, it will not be deleted after 90 days.
You can view correspondence items sent from TCRS to you using the Message Center screen.
Step 1 -- To navigate to the Message Center screen, click on the following menu options:
Services > Message Center
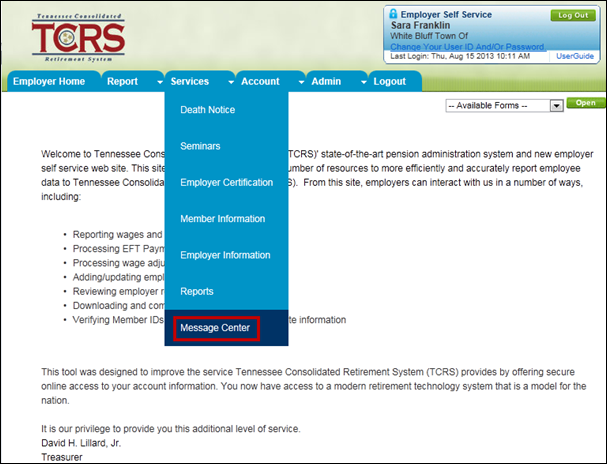
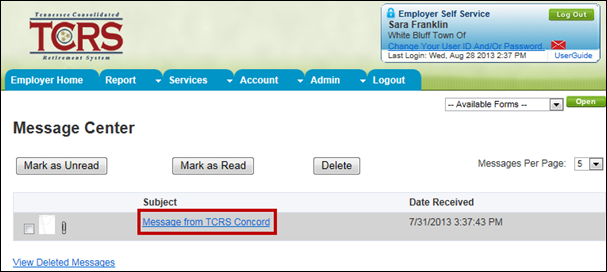
Step 2 -- The messages in your inbox display. Click the subject line link of the message to view it.
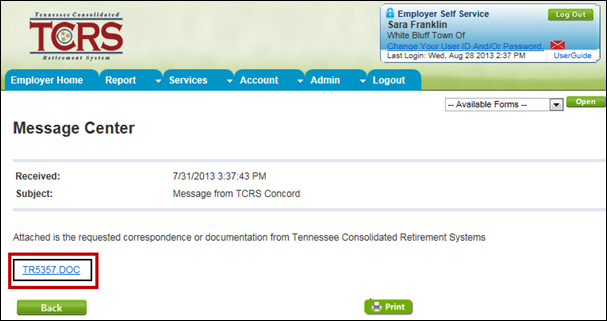
Step 3 -- The message displays. Click the attachment link to view it.
Step 4 -- The attachment opens as a separate document. You save it to your desktop.
![]()
You can flag a message as important in the Message Center screen. Flagging a message as important ensures that it is not deleted after 90 days.
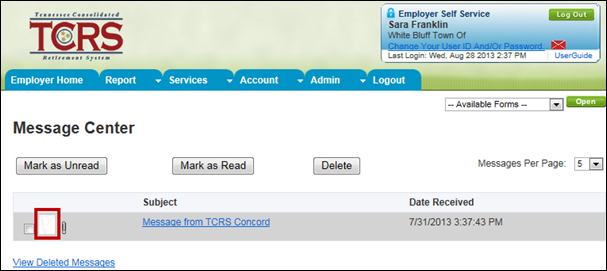
Step 1 -- From the Message Center screen, click the Flag icon next to the message you want to view.
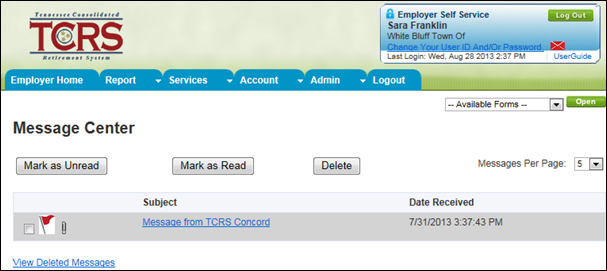
Step 2 -- The Flag icon displays next to the message.
You can delete correspondence items that you have already read and handled in the Message Center screen.
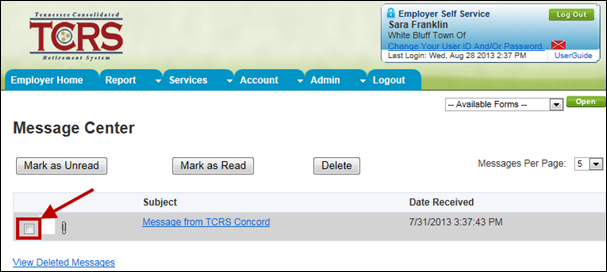
Step 1 -- From the Message Center screen, select the check box to the left of the message you want to delete.
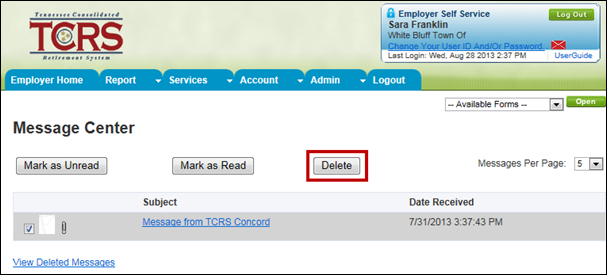
Step 2 -- Click
![]() .
.
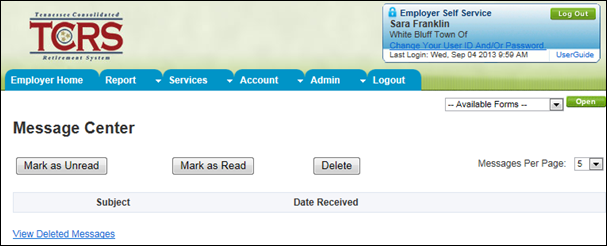
Step 3 -- The message is removed from your inbox.
You can change your password, PIN, or security question. You must be logged into ESS to do this.
Note: Other user roles with ESS access can request to have another individual’s password or PIN reset, but they cannot make any direct changes in the Manage Users module. By making that request, an automated email is sent to the user.
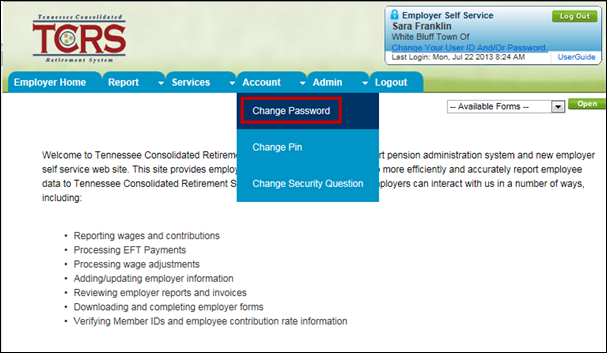
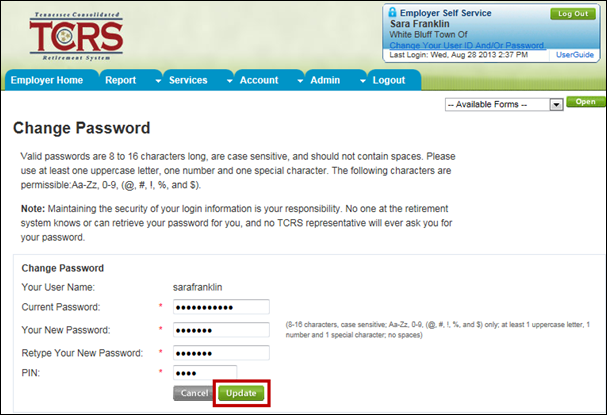
Step 1 -- To navigate to the Change Password screen, click on the following menu options:
Account > Change Password
Note: TCRS can only issue new user IDs. If you don’t remember your user ID, use the obtain user ID functionality in ESS.
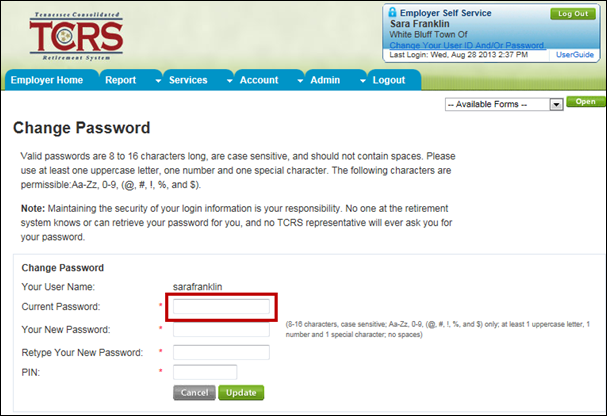
Step 2 -- Enter the current password in the Current Password field.
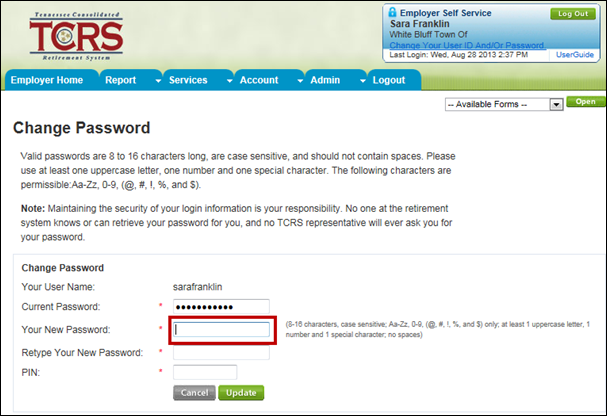
Step 3 -- Develop a new password abiding by the instructions to the right of the Your New Password field. Enter the new password in the Your New Password field.
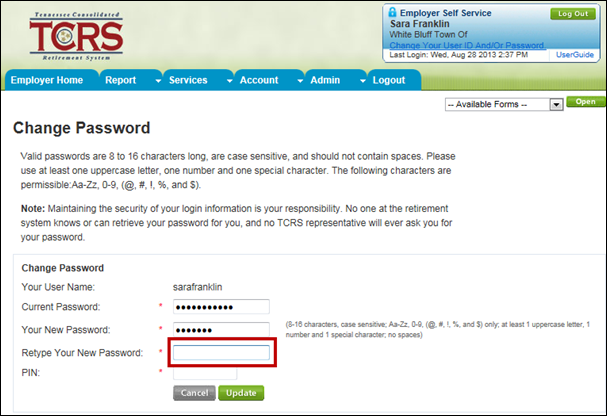
Step 4 -- Enter the new password in the Retype Your New Password field.
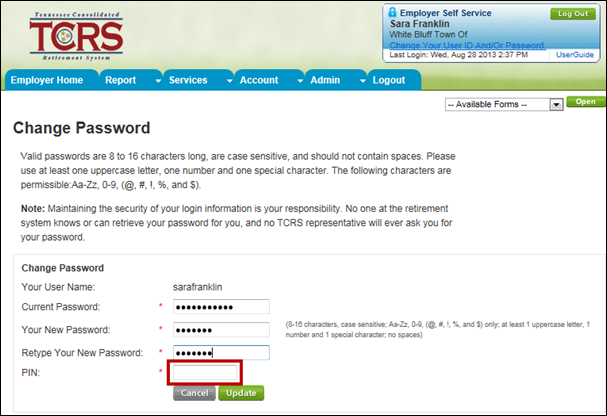
Step 5 -- Enter the PIN in the corresponding field.
Step
6 -- Click
![]() . The
password change takes effect immediately.
. The
password change takes effect immediately.
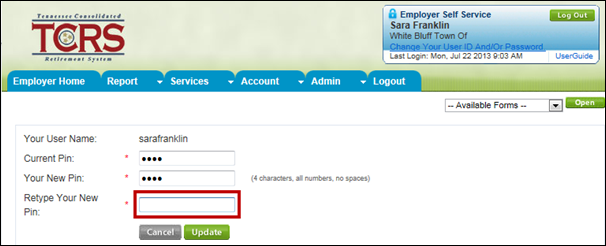
The following steps describe how to change your PIN.
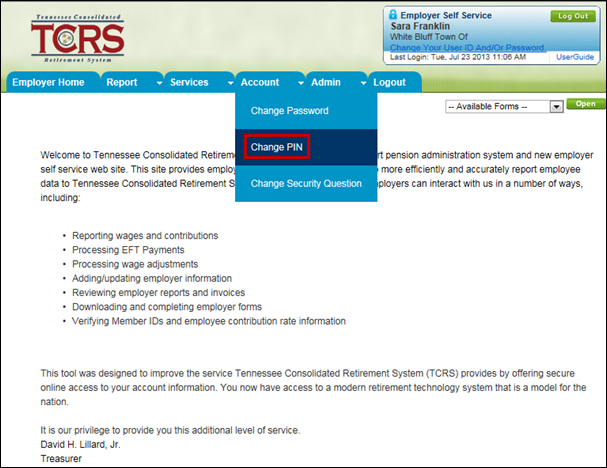
Step 1 -- To navigate to the Change PIN screen, click on the following menu options:
Account > Change PIN
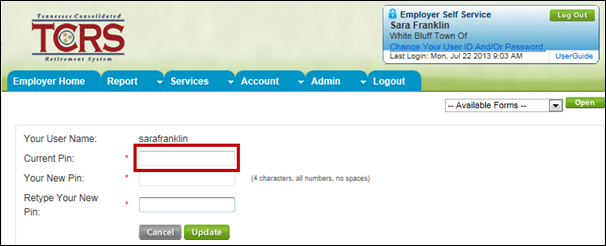
Step 2 -- Enter the current PIN in the Current PIN field.
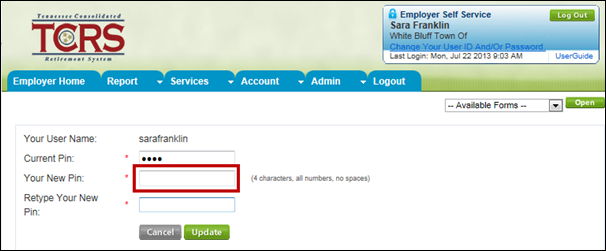
Step 3 -- Enter the new PIN in the Your New PIN field.
Note: The new PIN must be four digits in length.
Step 4 -- Enter the new PIN again the in the Retype Your New PIN field.
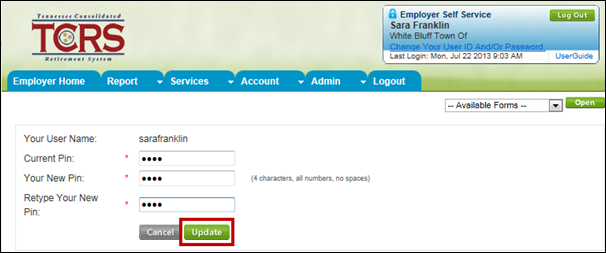
Step
5 -- Click
![]() . The
PIN change takes effect immediately.
. The
PIN change takes effect immediately.
17.3. Changing Your Security Question
The following steps describe how to change your security question.
Step 1 -- To navigate to the Change Security Question screen, click on the following menu options:
Account > Change Security Question
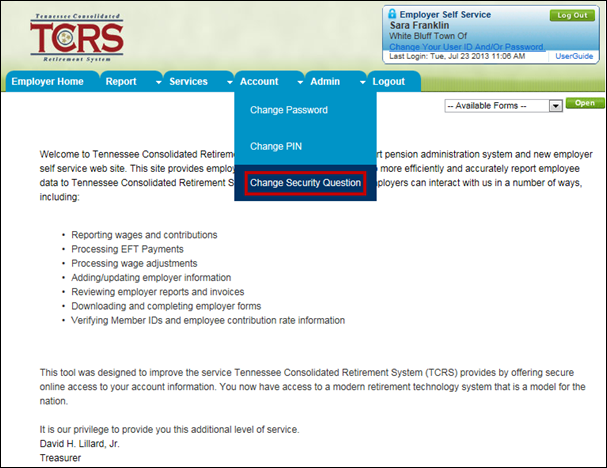
Step 2 -- The Update Security Question screen appears. The current security question displays. Select a new question from the Security Question drop down menu.
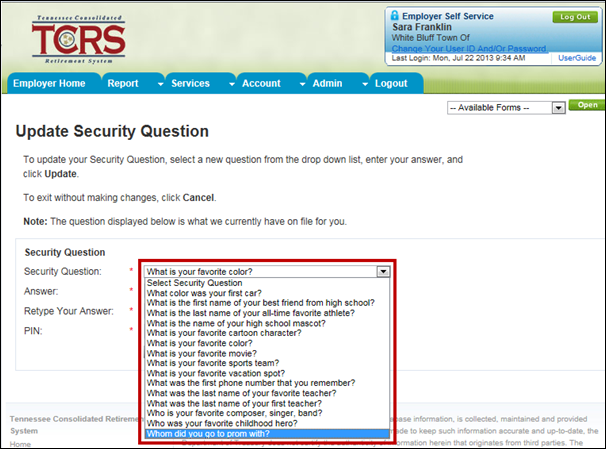
Step 3 -- Answer the new security question in the Answer field.
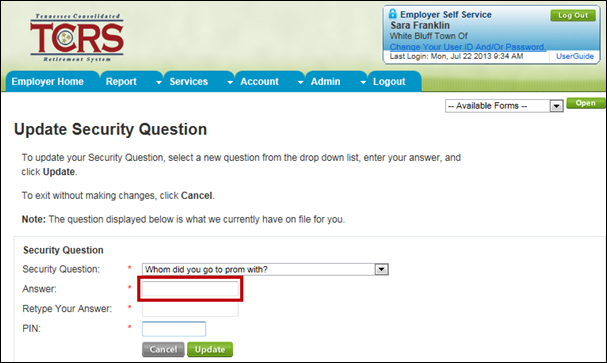
Step 4 -- Answer the question again in the Retype Your Answer field.
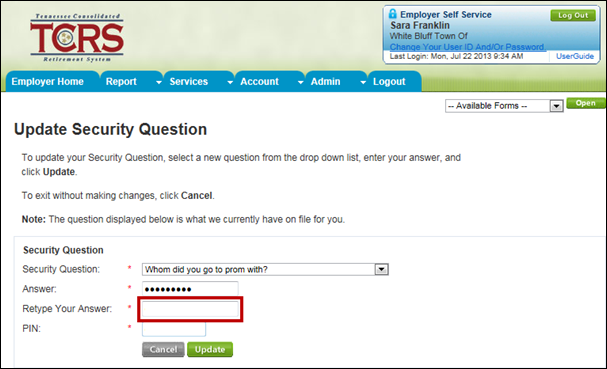
Step 5 -- Enter the PIN in the PIN field.
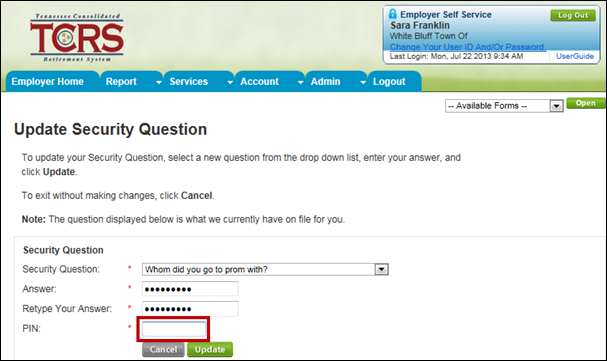
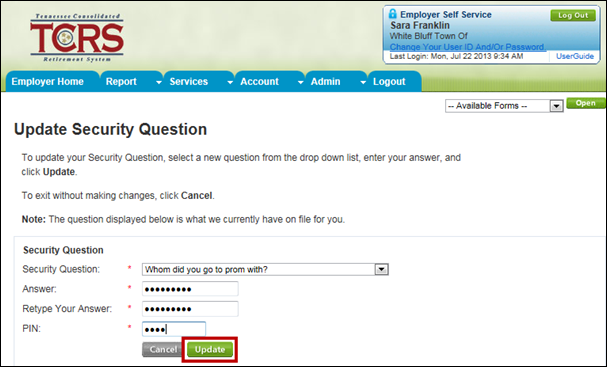
Step
6 -- Click
![]() . The
Security Question change takes effect immediately.
. The
Security Question change takes effect immediately.
Administrative and employer reporting users use the Payment Accounts screen to manage payment methods. You use this screen to setup EFT or eCheck accounts (which can then be used by the Monthly Reporting process to remit payment), setup multiple payment accounts with mixed payment types, allow payments from multiple accounts to be remitted, and setup accounts to pay monthly reports and invoices.
Note: Select employers will be setup with LGIP payment accounts. This account will not display in ESS. TCRS pulls the appropriate payments via LGIP once the monthly report is submitted.
18.1. Adding a Payment Account
You can add a new payment method to your organization’s account. New payment methods include EFT or eCheck.
Step 1 -- To navigate to the Manage Payment Accounts screen, click on the following menu options:
Admin > Manage Payment Accounts
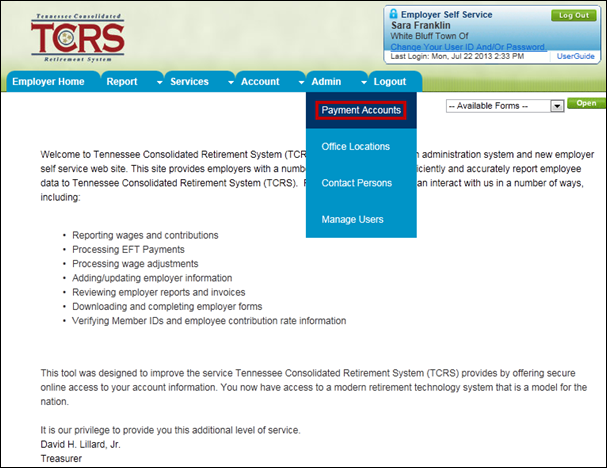
Step 2 -- If
there are any existing payment accounts, they display on this screen.
To add a new payment account, click ![]() .
.
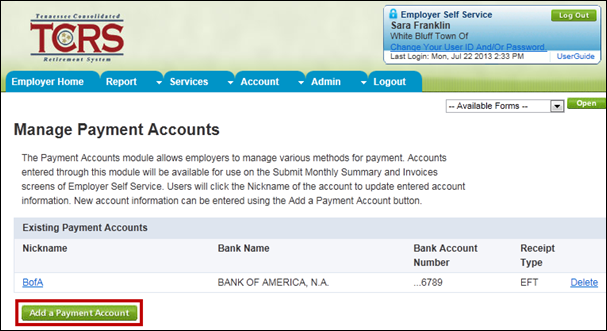
Step 3 -- Enter all required information on the screen:
· Receipt Type
· Nickname
· Bank Routing or ABA Number
· Bank Account Number
· Retype Bank Account Number

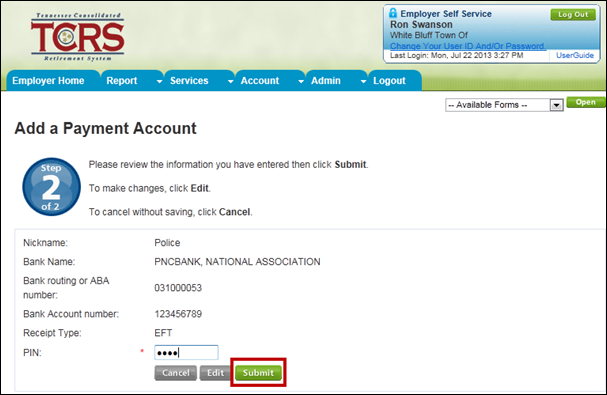
Step 4 -- Click
![]() .
.
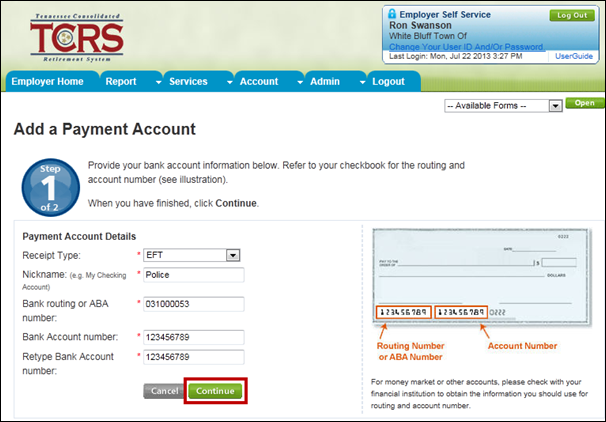
Step 5 -- Enter your PIN.
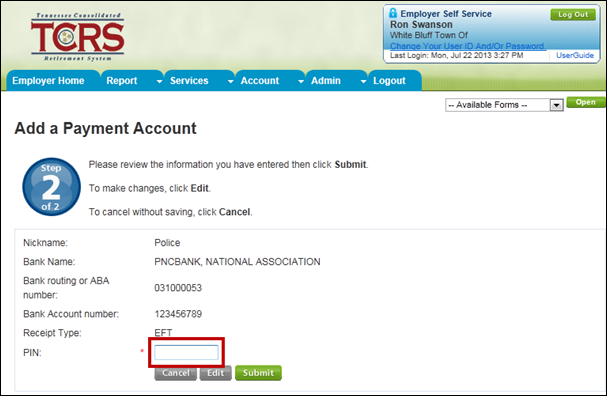
Step 6 -- Click
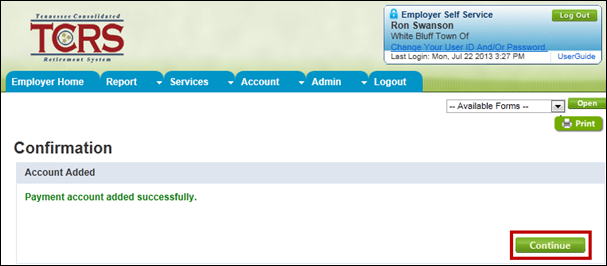
![]() . The
payment account updated successfully message displays to confirm that
payment account was saved.
. The
payment account updated successfully message displays to confirm that
payment account was saved.
Step 7 -- Click
![]() to
return to the Manage Payment Accounts screen.
to
return to the Manage Payment Accounts screen.
18.2. Updating a Payment Account
You may need to update an existing payment account with new information.
Step 1 -- From the Manage Payment Accounts screen, click on the name of the existing payment account that you want to update.
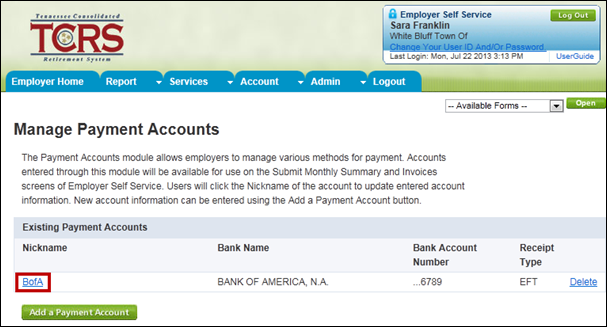
Step 2 -- Update the payment account information as needed.
Note: Only the account Nickname may be edited on this screen.
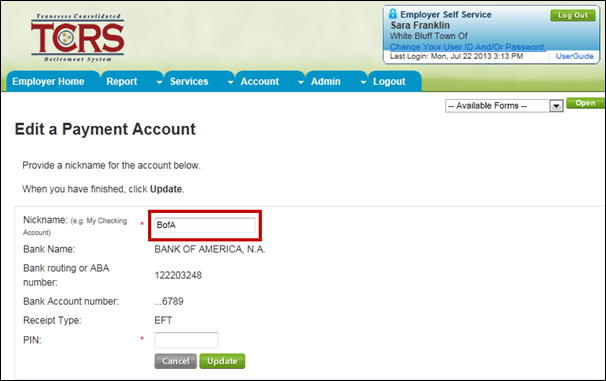
Step 3 -- Enter your PIN.
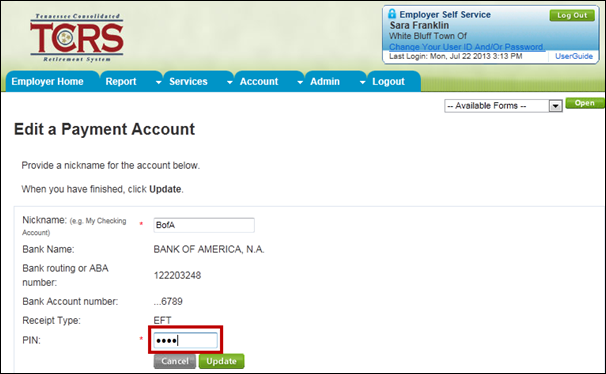
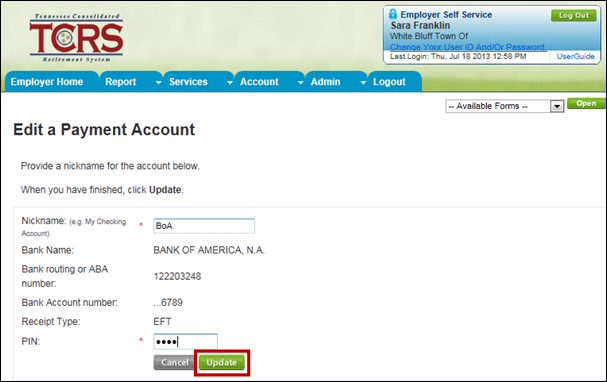
Step 4 -- Click
![]() . The
payment account updated successfully message displays to confirm that
updates have been saved.
. The
payment account updated successfully message displays to confirm that
updates have been saved.
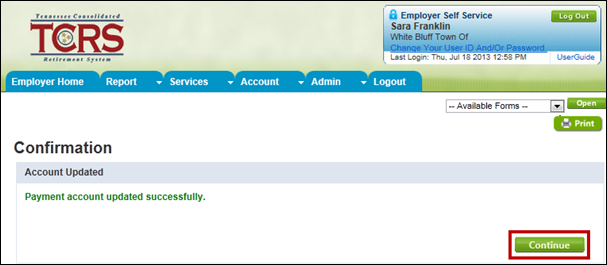
Step
5 -- Click
![]() to
return to the Manage Payment Accounts screen.
to
return to the Manage Payment Accounts screen.
18.3. Deleting a Payment Account
You may need to delete an existing payment account due to disuse. If there is a pending payment associated with this account, you cannot delete it.
Note: Deleted payment accounts will not be available in ESS, but they will be visible within TCRS’ retirement system.
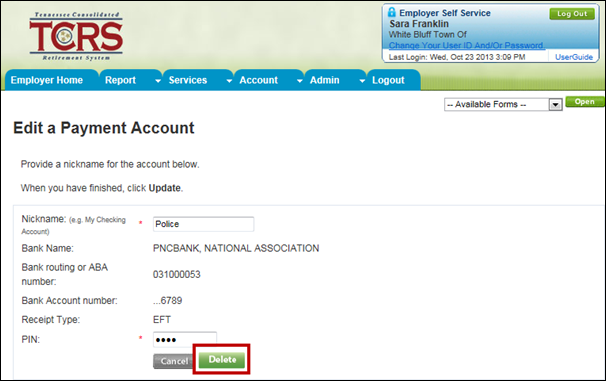
Step 1 -- From the Manage Payment Accounts screen, click the Delete link next to the existing payment account that you want to delete.
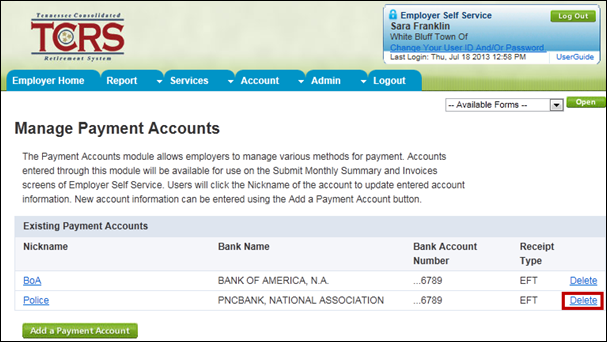
Step 2 -- The Edit a Payment Account screen displays. Enter your PIN in the PIN field.
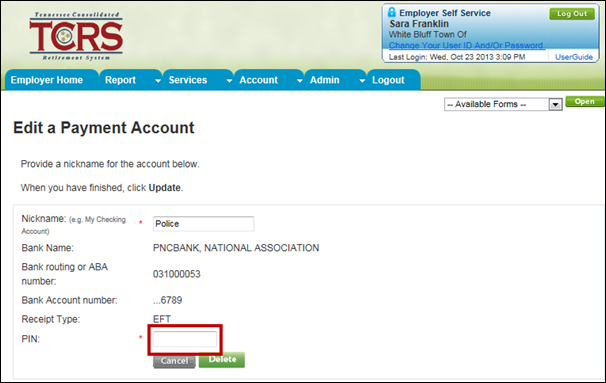
Step 3 -- Click
![]() .
.
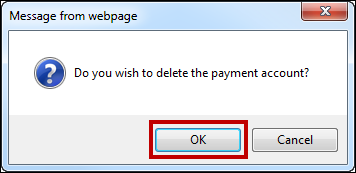
Step
4 -- A
confirmation pop up window displays. Click ![]() to
delete the payment account.
to
delete the payment account.
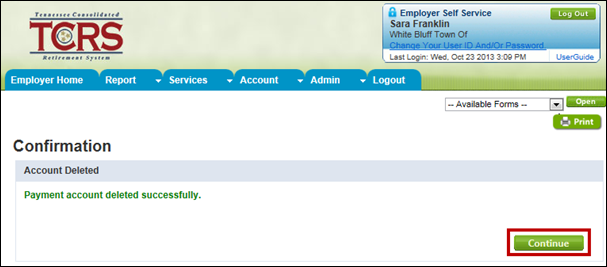
Step
5 -- The
Confirmation screen displays. The payment account deleted successfully
message displays to confirm that the payment account was deleted. Click
![]() to
return to the Payment Account screen.
to
return to the Payment Account screen.
All those with ESS access (administrative, employer reporting, and staff) can use the Office Location screen to add, update, or delete office locations associated with their organization. After an office location is added, you can associate the location with a contact person using the Contact Person screen. See Section 20, Contact Persons, to view more information and steps on this screen.
Note: New addresses and updated addresses are validated using the Melissa web service. This service validates that the address entered is a deliverable address according to the US Postal Service. This web service does not exclude you from entering an address that is not included in Melissa web service.
Note: Before adding a new contact person, an office location must be set up and a primary reporting official must be designated. See Section 19, Office Location for more information on adding an office location. You must assign a primary contact person to each address listed. Contact types with more than one contact listed, must have a primary contact assigned.
19.1. Adding an Office Location
If your organization has a new office, enter the new office location using the Office Location screen.
Step 1 -- To navigate to the Office Location screen, click on the following menu options:
Admin > Office Locations
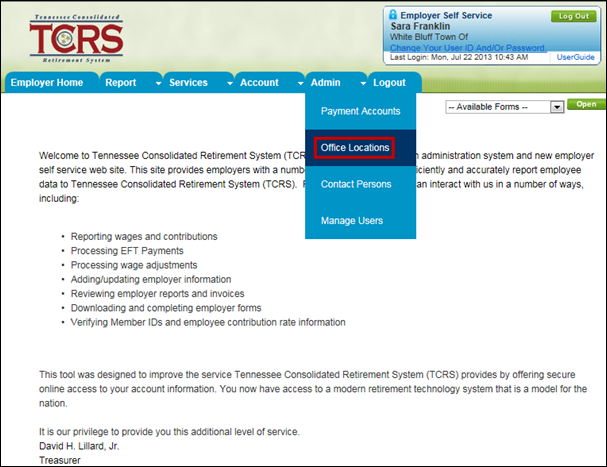
Step 2 -- If
there is an office location on file, the location displays. Click ![]() .
.
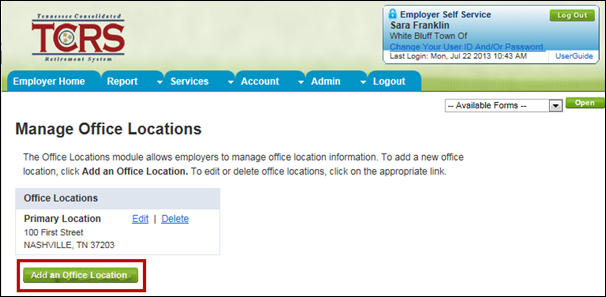
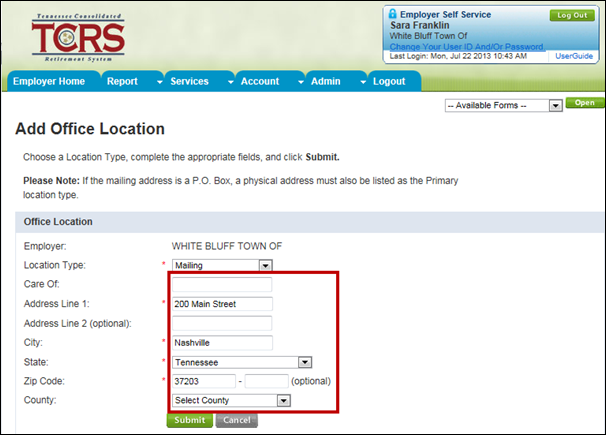
Step 3 -- The Add an Office Location screen displays. Select an option from the Location Type drop down menu.
Note: You can have only one physical location. However, you can add as many satellite locations as necessary.

Step 4 -- Enter the remaining office location information.
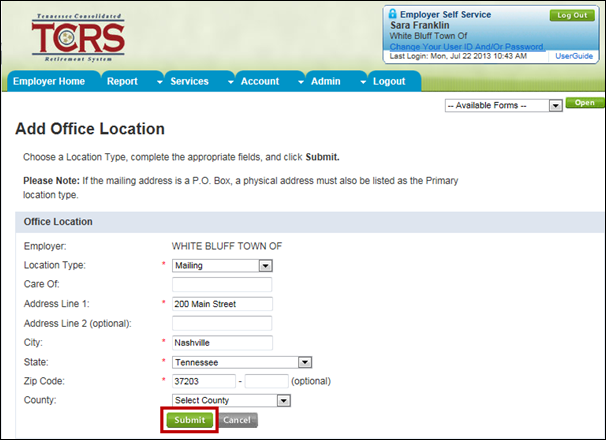
Step 5 -- Click
![]() . If
the address is verified, the Office location saved successfully message
displays to confirm that the addition was submitted.
. If
the address is verified, the Office location saved successfully message
displays to confirm that the addition was submitted.
Note: An error will display if the web service is unable to verify the address entered into the Add Office Location fields. The system displays the original address and a suggested address; the suggested address is what the USPS has on file. It is highly recommended that the suggested address is used.
19.2. Updating an Office Location
Use the Office Location screen to update one of your organization’s current office locations.
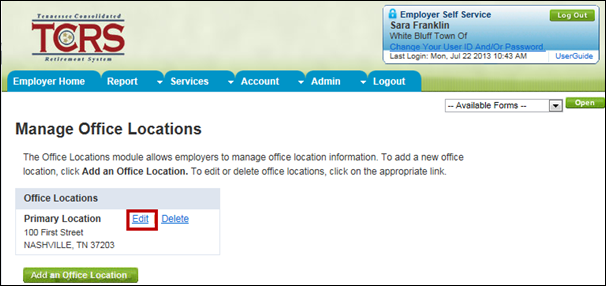
Step 1 -- From the Office Location screen, click the Edit link next to an existing office location.
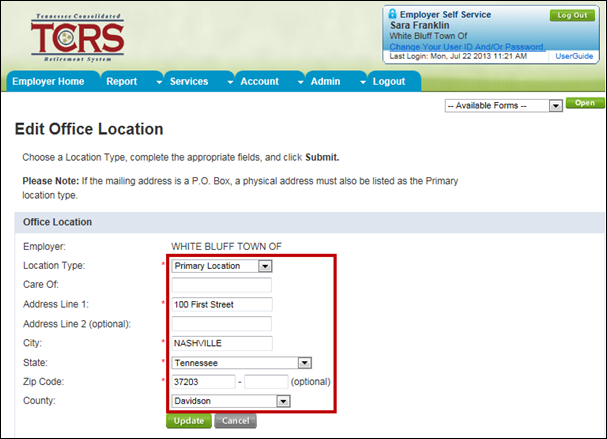
Step 2 -- The Edit Office Location screen displays. Update the office location.
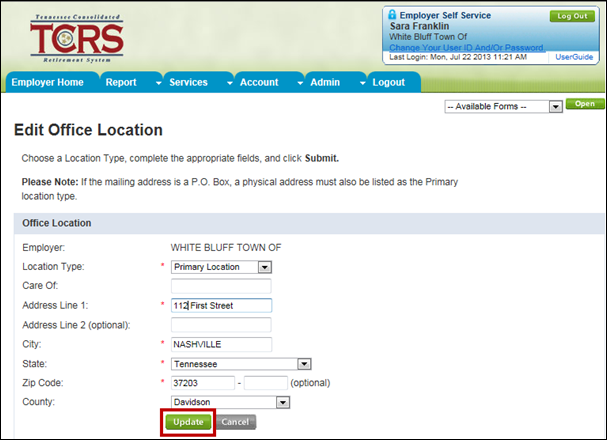
Step 3 -- Click
![]() . If
the address is verified, the Office location saved successfully message
to confirm that the location was updated.
. If
the address is verified, the Office location saved successfully message
to confirm that the location was updated.
Note: An error will display if the web service is unable to verify the address keyed into the Add Office Location fields. The system displays the original address and a suggested address; the suggested address is what the USPS has on file. It is highly recommended that the suggested address is used.
19.3. Deleting an Office Location
If your organization no longer uses an office location listed on the Office Location screen, you can delete the location.
Note: Before deleting an office location, you must first remove all contact persons from that office location, using the Contact Person screen (See Section 20, Contact Persons, for more information on these steps).
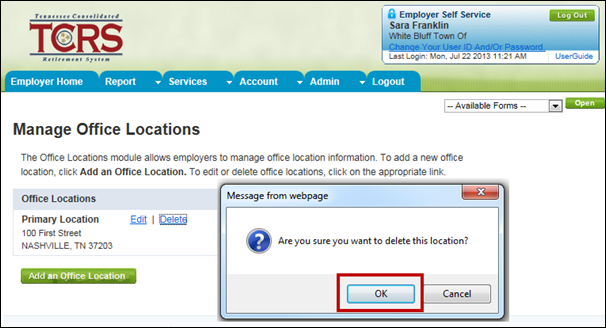
Step 1 -- From the Office Location screen, click the Delete link.
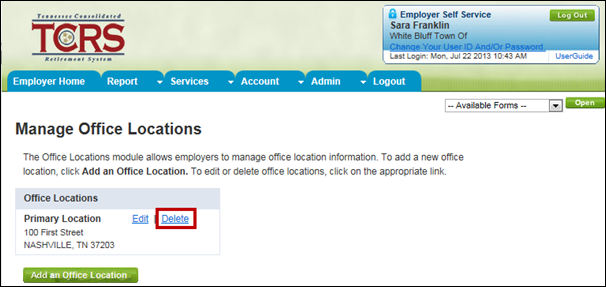
Step 2 -- Confirm that you want to delete the office location. The office location is deleted from the Office Location screen.
All staff (administrative, employer reporting, and staff) can use the Contact Persons screen to add, edit, or delete contact information for contact persons for your organization.
Contact persons may be added to assist with ESS tasks.
Note: At least a primary reporting official is required to be set up before other contact persons are created.
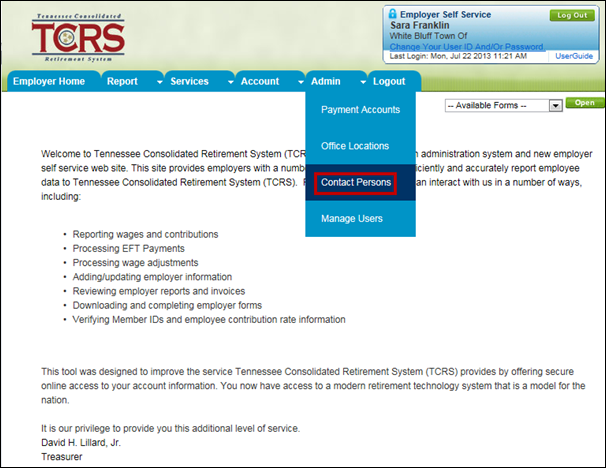
Step 1 -- To navigate to the Contact Persons screen, click on the following menu options:
Admin > Contact Persons
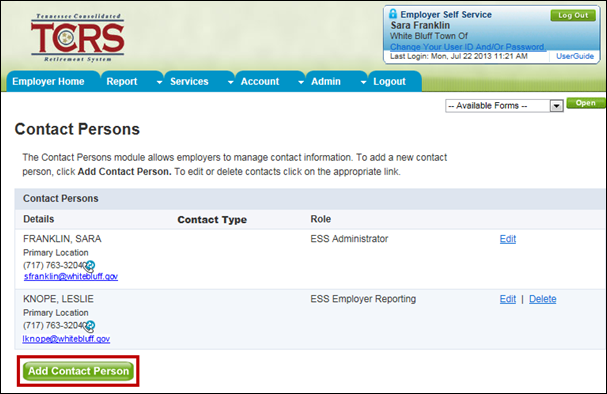
Step
2 -- Click
![]() .
.
Step 3 -- Enter the required information. Required information includes:
· First Name
· Last Name
· Office Location
· Work Phone
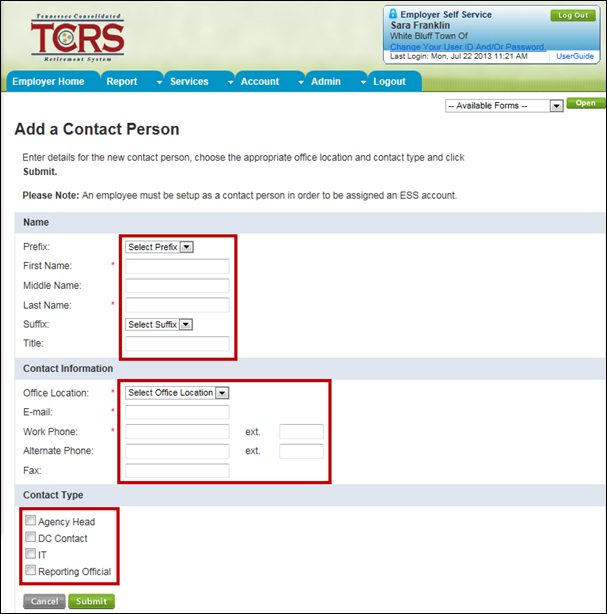
Step 4 -- If the contact person is the primary contact for the employer, select the Set as Primary Contact check box.
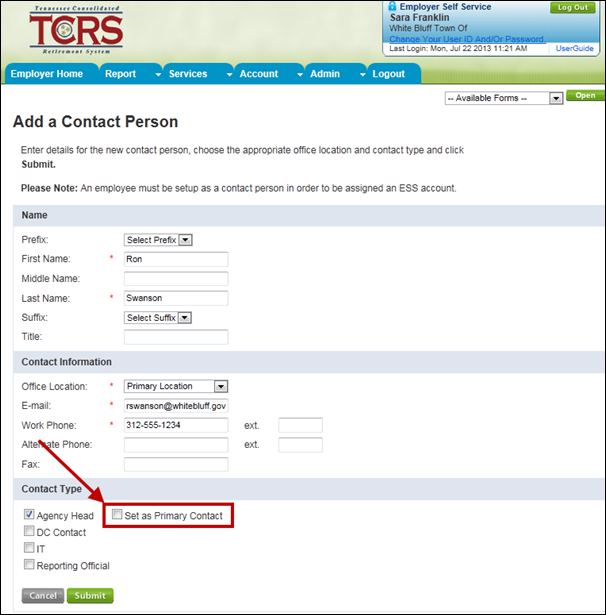
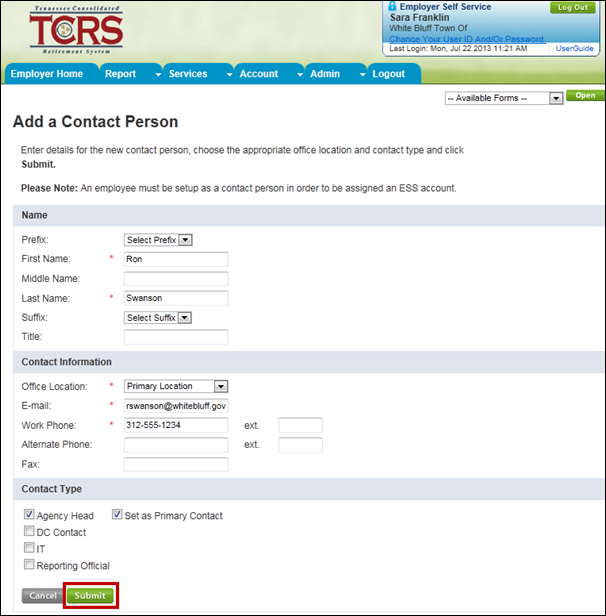
Step 5 -- Click
![]() . The
Save was Successful message displays to confirm that the contact person
was added.
. The
Save was Successful message displays to confirm that the contact person
was added.
Step
6 -- Click
![]() to
return to the Contact Persons screen.
to
return to the Contact Persons screen.
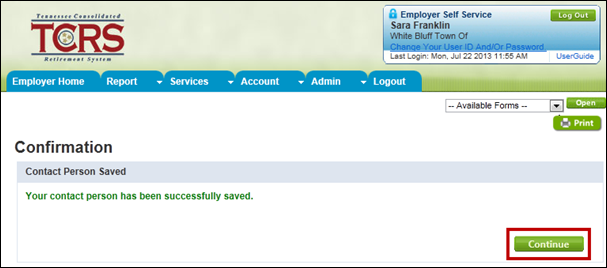
20.2. Editing a Contact Person
Contact person information may need to be edited if the information was keyed incorrectly upon entering in in ESS, if a contact person has changed his or her name, if a contact person’s role has changed, or for other administrative reasons. You can update information for any of the contact persons in your organization.
Step 1 -- From the Contact Person screen, click the Edit link.
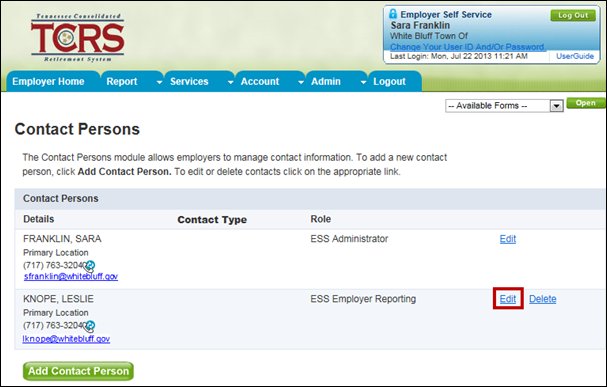
Step 2 -- Update the contact person information.
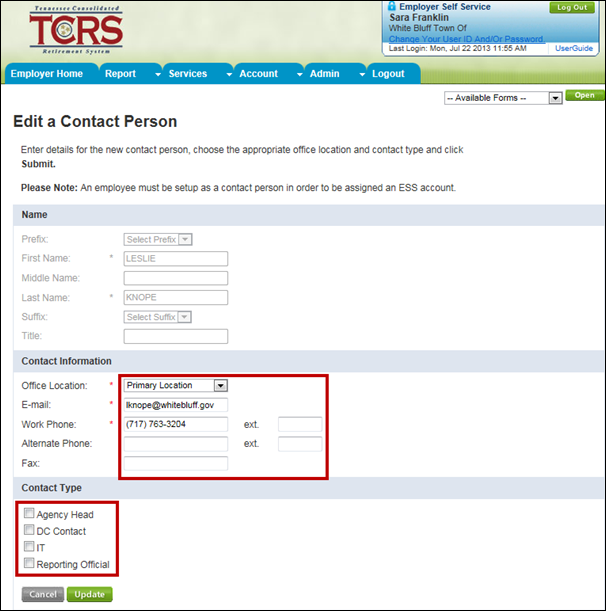
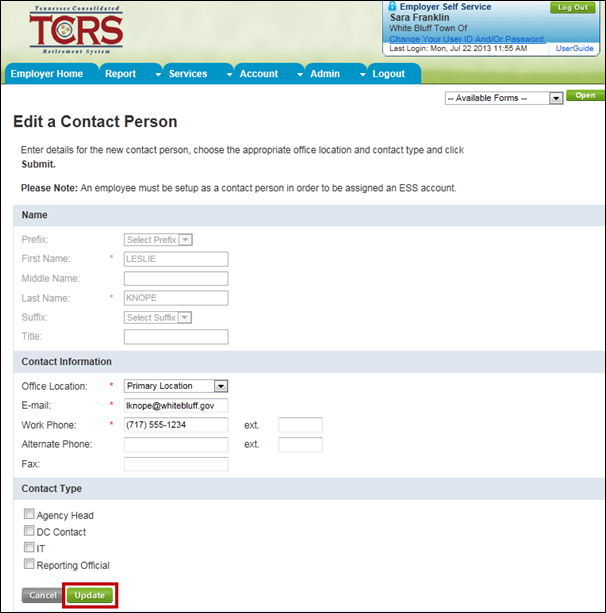
Step 3 -- Click
![]() . The
Save was Successful message displays to confirm that the contact person
information has been updated.
. The
Save was Successful message displays to confirm that the contact person
information has been updated.
20.3. Deleting a Contact Person
Certain contact persons in the organization may be deleted if they are not associated with an ESS user account; however, primary reporting officials cannot be deleted without first naming a new reporting official.
Step 1 -- From the Contact Person screen, click the Delete link.
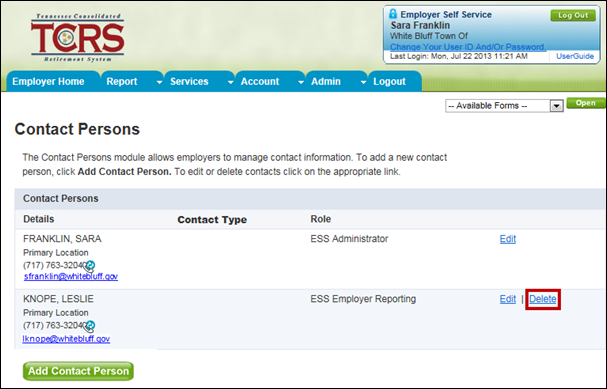
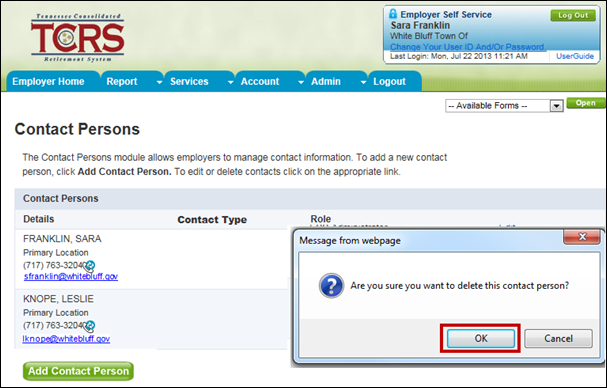
Step 2 -- The “Are you sure you want to delete this contact person?” message displays. Click OK to delete the contact.
Administrative users use the Manage Users screen to add, remove, and edit ESS accounts for their organization. Administrative users associate contact information created from the Contact Person screen to a specific role. There are three roles available in ESS:
· Administrative – have access to all functionality in self-service
· Employer Reporting – have access to all screens except for the Manager Users screen
· Staff – have access to non-essential screens such as Death Notice or Contact Persons
Note: TCRS will administer employer accounts using Concord only in the rare instances that the employer’s administrative user is not available or has been locked out of ESS.
You must add a new employee as a person in the Contact Person screen before adding them as a new user. See Section 20.1, Adding a Contact Person for steps to add a new employee as a contact in ESS. Once you have added the person as a new user, they must log into ESS where they are prompted to change their password, PIN, and answer security questions.
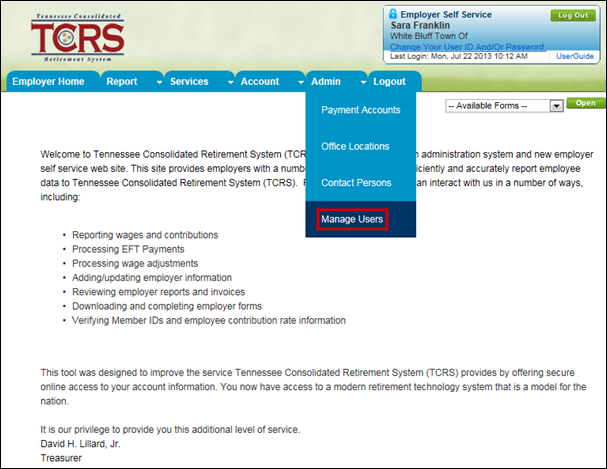
Step 1 -- To navigate to the Manage Users screen, click on the following menu options:
Admin > Manage Users
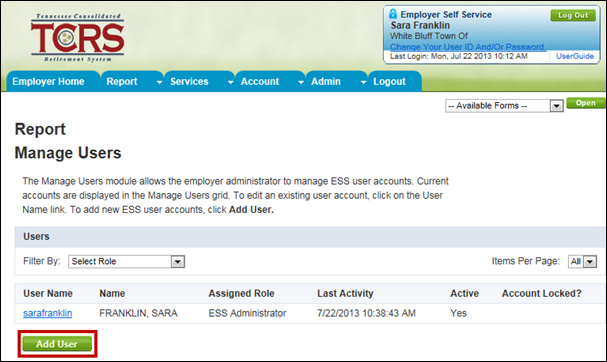
Step
2 -- Click
![]() .
.
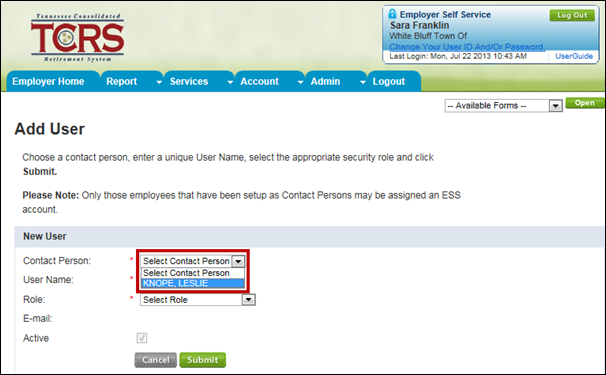
Step 3 -- The Add User screen displays. Select a contact person from the Contact Person drop down menu.
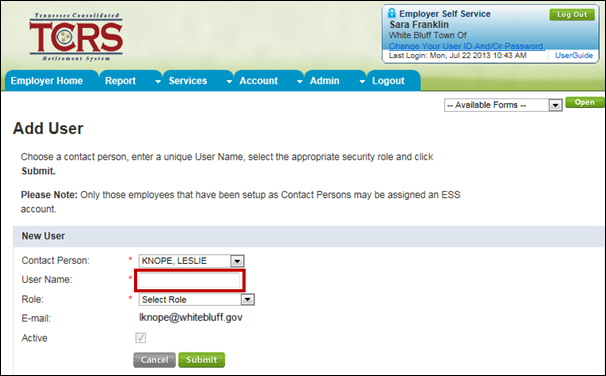
Step 4 -- The email address for the user displays. The status of the user is automatically set to active. Enter a unique user ID for the person.
Note: The user ID must be between 5 and 20 characters, using characters A-Z, a-z, and number 0-9.
Step 5 -- Select a role from the Role drop down menu.
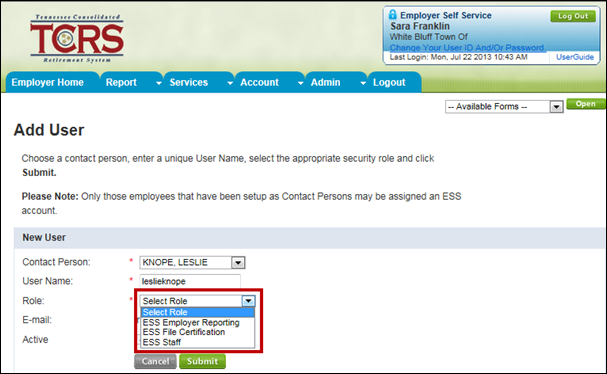
Step 6 -- Click
![]() . Three
separate emails are sent to the new user, each with the user ID, temporary
password, or PIN. The User ID, Password, and PIN information sent message
displays to confirm the addition of a new user.
. Three
separate emails are sent to the new user, each with the user ID, temporary
password, or PIN. The User ID, Password, and PIN information sent message
displays to confirm the addition of a new user.
Note: The user must sign into ESS within 72 hours with the login information emailed to them before the information expires. See Section 3.1, Logging into Employer Self-Service for the First Time for more information.
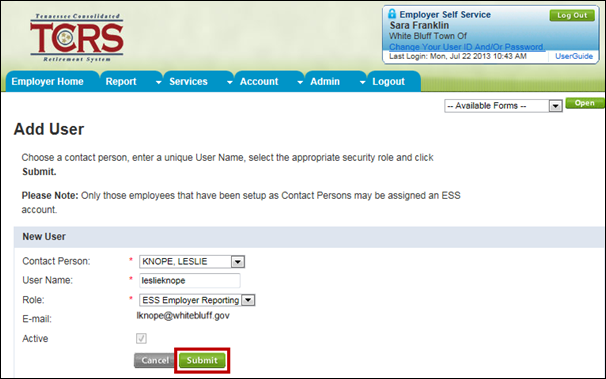
Step 7 -- Click
![]() .
.
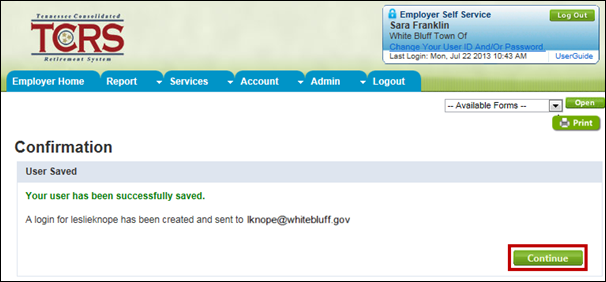
Step 8 -- The Manage Users screen displays with a list of all users for your organization.
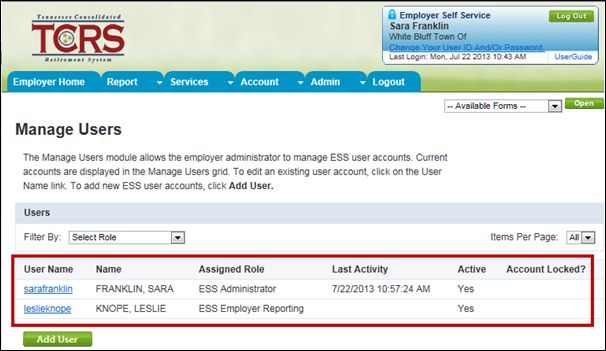
If a user is no longer employed with your organization or they no longer need access to ESS, an administrative user must deactivate their account.
Step 1 -- From the Manage Users screen, click the User Name link.
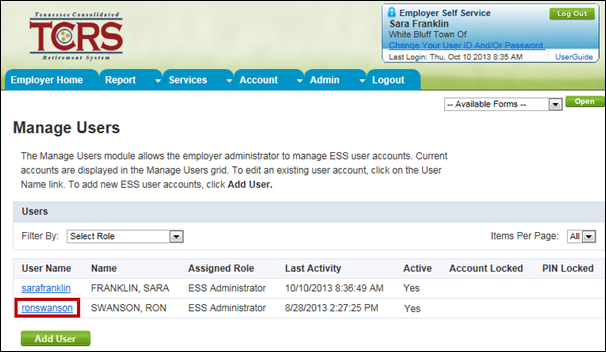
Step 2 -- Deselect the Active check box.
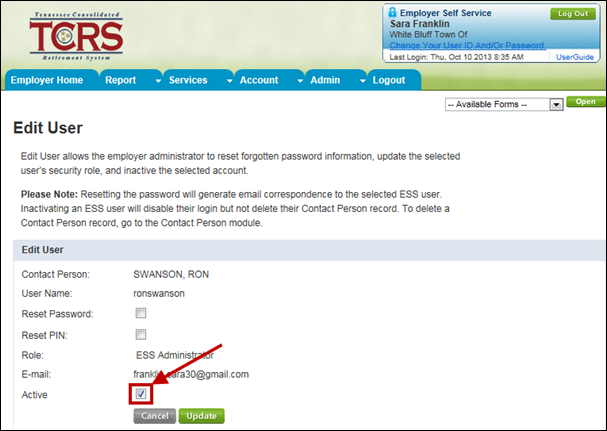
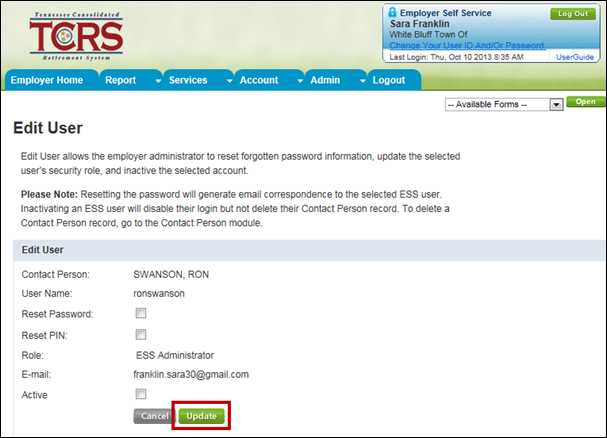
Step 3 -- Click
![]() . The
user’s account is deactivated.
. The
user’s account is deactivated.
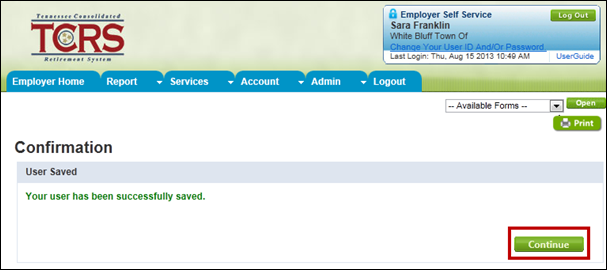
Step 4 -- A
Confirmation screen displays to confirm the account is deactivated.
Click ![]() to
return to the Manage Users screen.
to
return to the Manage Users screen.
Step 5 -- The user is no longer listed as active.
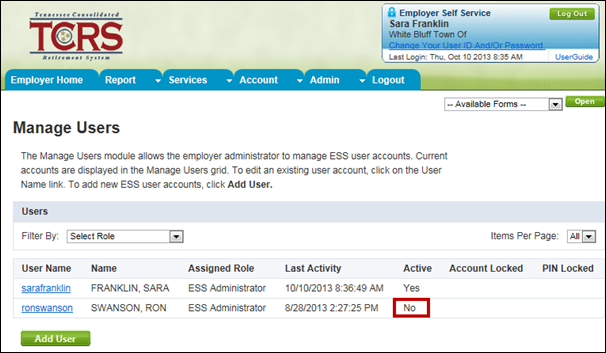
21.3. Resetting a User’s Password
In some instances it is necessary for the administrative user to reset a user’s password. The following steps how to do this.
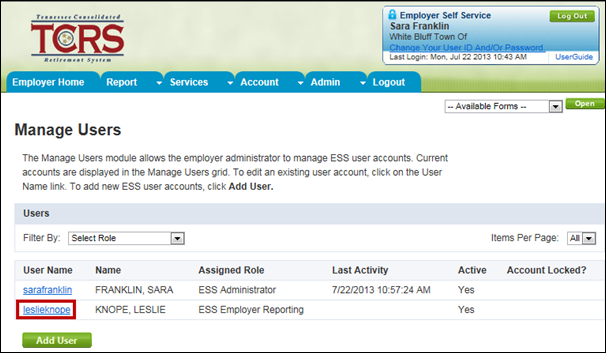
Step 1 -- From the Manage Users screen, click the User Name link.
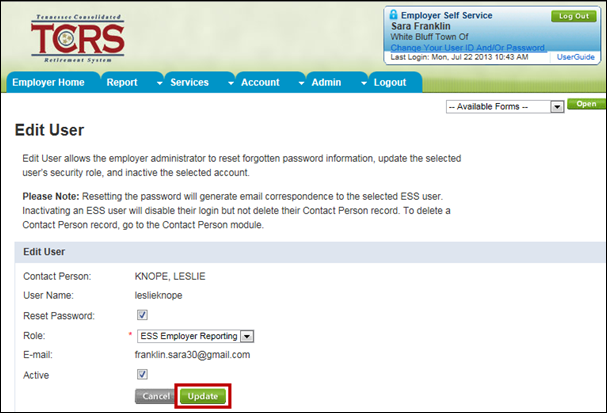
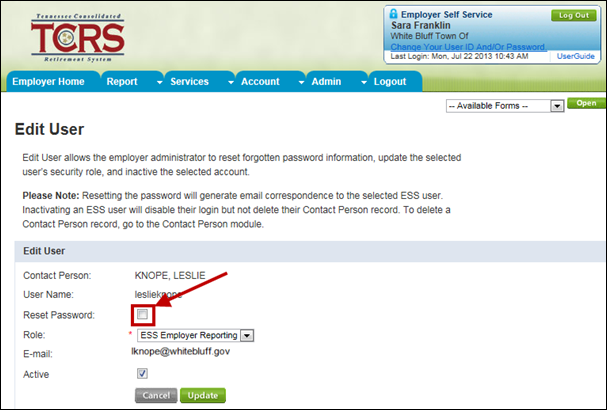
Step 2 -- Select the Reset Password check box.
Note: PINs may only be reset by TCRS staff.
Step 3 -- Click
![]() . A
temporary password is sent to the user.
. A
temporary password is sent to the user.
